

Spoiler alert: This isn't my dream brick floor in an English cottage on a sheep farm. Or a villa on my lemon farm in Italy. Whatever. Sometimes a girl has to improvise and create the home of her dreams in a mid-century colonial in Tennessee. I don't even care because this might just be my favorite project ever. I know. I know. You've heard that before, but y'all, this time I'm serious.

I was so excited about this project that I broke the number one rule of wifedom: when your husband offers to buy you something you should let him. I turned down black and white square tile (my other floor fantasy) because I adore exhaustion, sore muscles, and scrounging around for some expired muscle relaxers in my medicine cabinet at 2 A.M.
Speaking of husbands, if you need to do this before he realizes what's up, read Guerilla Decorating: A 5 Step Guide to Decor-Revolution.
If you missed my post about prepping to paint concrete, you can read it here.

I think I left out that part of the prep is definitely going to be creating a sample board to nail the color combo down. Obviously so you can then completely ignore it.

When I imagined doing this project I envisioned a regular size paint roller on the end of a pole where I would knock out this floor painting business before lunch. Oh, wait. I forgot who I was. I should have known I would want to paint each individual brick a different color to achieve the most realistic look possible.
How to Paint a Faux Brick Floor:
Note: If you were painting a floor all over for a smooth finish the prep work would be much more intense. For this project, I used the imperfections to mimic actual brick. Plus I do not like intense but can completely get behind imperfect.

1. Clean and prepare the surface. This includes using premixed concrete to fill holes created when the carpet was removed. Sand the patches smooth after they dry and sweep up any dust and dirt. I swept and then used a shop vac.

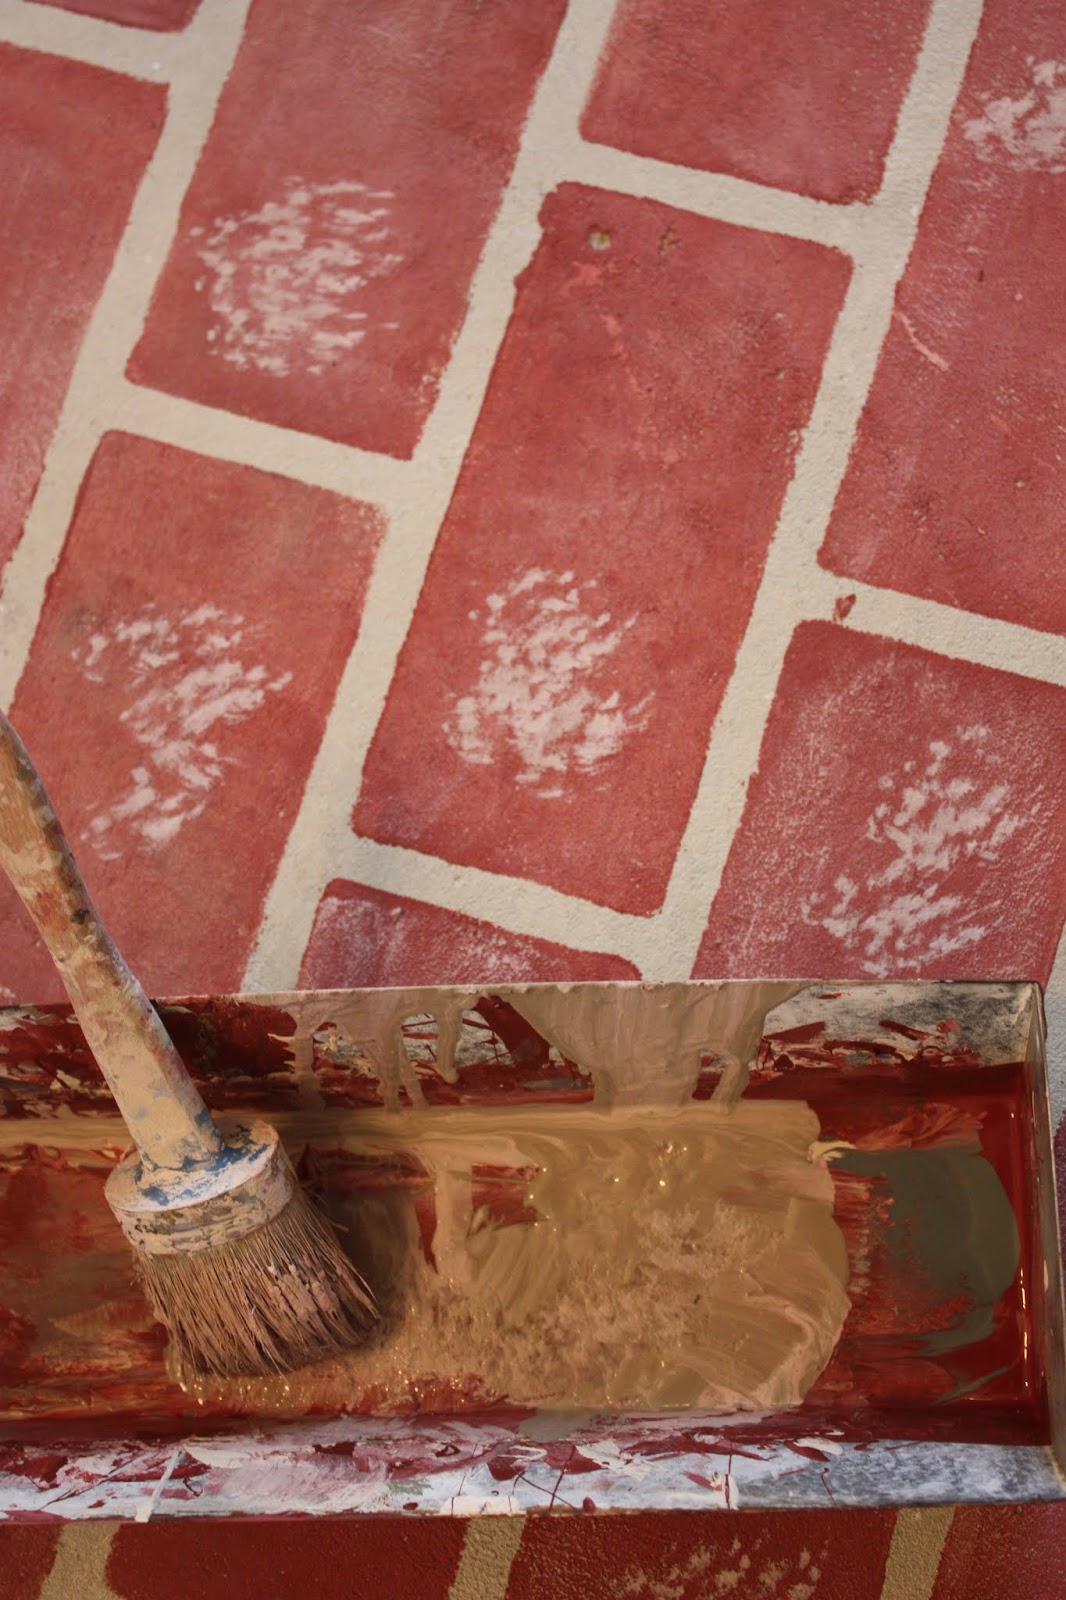
2. Lay out the stencil according to your design. For this floor, I wanted an edge of straight brick which I thought looked more authentic than a brick pattern that just disappears under a wall.

3. Choose and mix paint colors. This depends on the color of brick you are trying to recreate. The outside of our house is red brick but I wanted a good bit of pink to tie in with the cabinets and countertops. The base color was Jolie Terra Rosa, with hints of Sage, Legacy, Palace White, and Rose Quartz. Have y'all figured out that I'm just making everything up as I go along?

4. Hold your stencil in place with painter's tape then use a roller to apply the paint. A big one if you are normal. A tiny one if you are trying to recreate each individual vintage brick you have ever seen. Because the bare concrete is so absorbent I was able to skip the normal offloading technique which is stenciling 101 and go straight to the concrete. I painted the center of the bricks first (offloading a lot of paint) then worked toward the edges to keep paint from seeping under the stencil

5. Distress. When the basic painting was done I flicked paint, mixed up a whitewash and spread it out in various spots to mimic extra grout, and sanded to achieve a flat clay like finish.

6. Seal with a concrete sealer if desired. I'm in a holding pattern on this part because I am so happy with how the faux brick turned out and I don't want to ruin it by adding shine. Also, I'm not sure I'm done doing things to it. I'm on the hunt for a completely flat/no shine/matte sealer for concrete. I mean let's just toss aside the idea that the point of redoing the floor at all was to seal it and make it durable.

7. Enjoy your new floor! Because Jolie paint dries on concrete so quickly you can replace furniture and walk on it the same day. Actually, you can walk on it pretty much immediately. Remember when I painted the porch and it took days to dry? Not this time!

Note: for all of you people I see posting on social media to ask about who has a good full body workout, look no further.

Even though the cottage floor project was physically challenging because I got up and down off the floor 5,728 times it turned out even better than I expected.

Cost for this project:
$35.00 for the stencil (I don't remember which one I ordered and the packaging has no name, but there are several online that look like it.)
$38.00 for a quart of Jolie Terra Rosa
$12.00 for concrete patch

The other various colors of paints I had already in sample sizes. Colors mentioned above. The total was less than a hundred bucks but I did already have the necessary tools like the mini roller and sandpaper.

This project start to finish took a solid 5 days from moving the furniture out to putting the furniture back.

In the pro column for this project is the fact that If I get tired of this faux finish the floor is ready to put tile down. It was inexpensive and gives you a lot of visual bang for your buck. The only con was the labor. But it's like having a baby. As soon as you see it you forget all the pain involved.

I'm already imagining a brick patio...
XOXO Y'all!

OH MY GOSH I LOVE IT!!!! You did a FANTASTIC job of creating seriously realistic brick!
ReplyDeleteThank you so much! It was fun and I really love it!
DeleteThat turned out so great. We have concrete floors in our lower floor...our living area is concrete because it was going to eventually be a garage...I've been thinking lately of cool ways to maybe paint it. I don't think brick would fit out craftsman style, but there are so many cool ideas.
ReplyDeleteYes, there are so many options! And the stained concrete looks amazing too. Have you seen it stained and scored to look like stone?
DeleteThank you very much for sharing such a useful article. Will definitely saved and revisit your site Chapewerken
ReplyDeleteThis comment has been removed by a blog administrator.
ReplyDelete