Tuesday, June 18, 2019
Deconstructing a Loveseat
It's a fact of life and DIY that things get worse before they get better. If this project had a quote it would be by Churchill, "When you're going through hell keep going."
Because really, who wants to stop and rest in hell?
It took me several years to know what to do with a free loveseat some friends gave us a few years back but then it came to me like a flash. Here's what I started with. A well made functional loveseat with some fairly dated fabric.
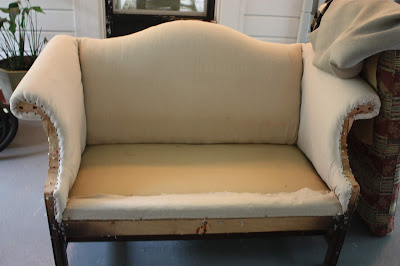
You might not recognize it because for the past couple of years it has looked like this.
How did I miss the micro-trend of deconstructed furniture? Why didn't y'all tell me? Check it out on Pinterest if you have no idea what I'm talking about.
It basically involves ripping all the fabric off a piece of furniture. Then adding back however much you want. I wish I could tell you how to do this. It is what it sounds like. I had to stop two hours in to run to Walgreens for Acetaminophen and Ibuprofen. Here are the other tools I used.
I found that the handiest tool was a really long skinny flathead screwdriver for prying fabric loose and then needle nose pliers for gripping staples and pulling them out. I now officially hate staples.
I should also say this: Actually reupholstering it would have been easier, so if you think this was the easy way out, keep reading.
Let me give you some advice if you are going to attempt this form of abuse. 1. Don't do it in your house if you can help it. It's nasty every step of the way and this piece wasn't even that old. 2. Wear gloves. So many staples. 3. Take a lot of breaks. It's like an all-day wrestling match. But eventually you get down to the bare bones of the thing and in the picture below you can see that I started reupholstering parts of it with drop cloths.
Again the how-to of this thing is really however you can, but taking off the back reveals how a lot of it is put together. I used a paint stirrer to shove the new fabric under the back and then tacked it to the frame. The sides worked the same way. Turning the piece over makes it much easier to do some of the work.
I was so happy when I uncovered the frame of this arm. I knew I'd be leaving this exposed.
I used drop cloths for the inside areas where you sit. On the outside areas, I used burlap. That is what was under the fabric on the back but it was old and dirty. I removed so much batting which immediately made this piece seem daintier and more streamlined.
In the photo above you can see some kind of indestructible fabric which was obviously created by Satan. I pried. I pulled. I cut. I cried. WHAT IS IT? It had threads of plastic running through it that reminded me of some old school tape from the 70s my dad used to use when he didn't have duct tape. I ended up cutting most of it out then just tucking the rest of it inside as I tacked on the new fabric.
You could speed the process up by using some kind of adhesive or a staple gun, I, however, chose to just use upholstery tacks for the entire project. My favorite part was putting the fabric on these curved arms. You could use the material you remove as a pattern for the new fabric but I just tacked and cut as I went. Carefully.
I knew on the back I wanted to add a detail, so I stamped No. 72 using Iron Orchid Decor Stamps. To me that makes it feel so legit. I stamped the burlap before attaching it.
I'm all finished except for covering the cushion which will be sewn.
I love the little pom poms of batting that are stuck in the wood. I still have lots of staples to remove but I'll probably leave these.
Why 72? I have no idea except when I saw the finished piece in my mind that's the number I saw there.
I loved this project. But if you are tempted to try this at home, let me warn you, it's a bloodbath. Well, there wasn't any actual blood but it was a battle. It's not for the faint of heart (faint of anything for that matter) Again...staples. but I cannot get over how it turned out. For the sake of these photos, I covered the cushion with some grey burlap.
I am in love with this project and if there is an actual bloodbath it will be if the cat tries to continue to use it as a scratching post.
 Michelle is a beekeeper and master gardener. She writes and speaks about beekeeping, DIY projects, and how to live your best creative life.
Subscribe to:
Post Comments (Atom)


Looks soo boho-chic & beautiful~ ✨ Great work!
ReplyDeleteThanks so much! It's been one of those problem pieces that always wanted to be something special.
DeleteYou're brave. I still have a dresser I need to tackle., and I just want to paint it..lol.
ReplyDeleteYou could easily get that done on a Saturday! I work at a shop where we sell Jolie paint and there's no stripping or sanding. You can just start painting. Choosing a color usually takes longer than doing the project! LOL
Delete