Saturday, December 19, 2015
Personal and Sentimental Last Minute Gift
We are down to the Christmas wire and I can feel some of you panicking. It's because I'm right there with you! All of a sudden there are people oozing out of my brain that I haven't thought to buy a gift for. Luckily I had this waxy trick up my sleeve.
Make a candle in a tea cup. This works best if the cup is something treasured or simply beautiful. It would be a great use of an odd set of cups you've inherited but have no real use for. The cup I used for this candle was one my husband remembers his mother drinking out of. There is only one and no one was ever going to be drinking out of this special cup. You can also find lovely odd pieces at the thrift store. Then, unless you are a beekeeper, head to a craft store and grab some beeswax and wicks
See what the wax looks like in the hive here.
I haven't made candles since I was about 12. Remember making them in milk cartons? Those were with paraffin wax and weren't even scented. This little project took just a few minutes. If you don't count the hundreds of hours tending bees and an hour or so rendering the wax. If you buy yours at the craft store it will be in pellets or a big block. I poured these wax discs myself.
Read about rendering beeswax here.
You start by grating the beeswax into a bowl so that it will melt faster and more evenly.
I melt it in the microwave 30 seconds at a time. Don't forget that whatever you melt beeswax in will be unusable for anything else. Designate one bowl for this project.
I stuck a wick in the bottom of the cup. You could glue it to keep it in place but mine seemed to stay secure. Just pour a little bit of wax in the bottom and let it set in place, then continue.
Use a knife to keep the wick straight. When the wax is thoroughly melted quickly quickly pour it into the cup.
Allow the wax to harden. You will see that the color changes to a beautiful honey yellow.
You could add color and scent to candle in the melted stage but I thought it was lovely in its natural state.
This is a very inexpensive project and takes only minutes. If you are baking challenged this is a very sweet home made gift of a different sort.
Merry crafty Christmas!
Labels:
Simply Home
 Michelle is a beekeeper and master gardener. She writes and speaks about beekeeping, DIY projects, and how to live your best creative life.
Thursday, December 3, 2015
Tipsy Honeybee Cocktail
I'm always looking around for ways to use honey and one of the classics is to mix it with bourbon and lemon. Even your teetotalling gramdmother likely mixed up the classic hot toddy when someone around the house was under the weather.
So on Thanksgiving Day when I wasn't exactly interested in bourbon for the medicinal value I thought I'd whip up something new. My entire Thanksgiving this year was a fly by the seat of my pants affair that involved very little planning and a lot of making it up as I went along. This is what happens when you aren't trying to impress anyone.
By the way if you ever are tying to impress someone throw a can of lump crab meat and a small can of diced jalapenos in your mac and cheese along with a healthy dose of the cheese of your choice. You'll look like a genius. I can already see that this will be a go-to dish from this day forward.
Where was I? Oh yes. The booze. I had some simple syrup I'd purchased last year and hadn't used. It found its way to the back of the pantry where it had the nerve to grow something icky in the bottom of the bottle. Which led me to searching online for how to make a simple syrup. You know how it goes...I ended up finding 7,280,000 results and about half of them were infused with something. Anything really. Herbs, flowers, spices, more alcohol. You get the picture.
This time of year there are a few herbs still going strong like sage, thyme, and rosemary in the garden. But what flavor of cocktail do you think would be perfectly paired with turkey?
Yep. Sage. So I mixed water and sugar and boiled it together then added the sage and let it cook for a while. Did you want exact measurements and times?
You're new here, aren't you?
Okay, since you asked:
2 parts sugar to one part water. Make whatever amount you want.
Bring water to a boil and add sugar slowly stirring until sugar is dissolved. Don't boil too long just until sugar is dissolved. Add a tablespoon or so of vodka to prolong shelf life but if you are using it immediately like I did there's no need. Add whatever you want in the way of flavor or nothing at all. If you have added something to make an infusion, strain it out. Let cool. Store any leftovers in the fridge.
Some recipes called for cooking the honey (if you are using it) with the sugar, water, and herbs. As a beekeeper I just don't like heating the honey. My rule of thumb is that if you can avoid it never heat your honey. It destroys some of the magical properties. (I assume you are not here for the science.) Add the honey at the last possible moment when things have cooled down. Then pour the bourbon and (no longer simple) syrup over ice straining out any bits of herbs or beeswax.
Muddle.
Isn't that a great word?
Garnish.
I like that world too.
Make up a fun name for your concoction.
Now, seriously, concoction is a really fabulous word.
This is a first cousin to an Old Fashioned or a Mint Julep. The differences are slight but mighty.
I'll be making this again soon with lavender! I'll let you know how that turns out. Meanwhile my dinner guests raved about the unique flavor of this drink. Don't be afraid to try something new if you want a signature cocktail for a gathering you are throwing together.
 Michelle is a beekeeper and master gardener. She writes and speaks about beekeeping, DIY projects, and how to live your best creative life.
Saturday, November 28, 2015
Goats Milk & Honey Soap Recipe
In addition to honey and hand cream I'd been wanting to try some soap recipes including honey or beeswax. I've been making this one for a few months now. There are about a million ways to make soap but if you want something simple and dealing with lye isn't your thing I get it. So to start here's a good one . I found this recipe originally posted by Heidi over at Happiness is Homemade on Pinterest. So many of these blogging home school moms make me miss home schooling!
Honestly, people, what did we do before Pinterest? Oh that's right we made huge messes by cutting pictures out of magazines!
Of course you know what happened. I took a perfectly simple 10 minute recipe and played with it a bit and here's what I came up with. Step one is to gather your ingredients.
1 pound of goats milk soap
3 TBS honey
vitamin E I use two or three capsules
1 TBS of calendula infused olive oil
essential oils you just have to play with the amount and combinations
a drop or two of food coloring or soap colorant unless you want a really white soap
...and a mold of whatever your little heart desires.
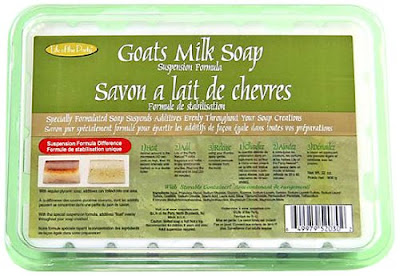
Here is the kind of soap I used. It's an easy peasy melt and pour item. I've purchased it from both Amazon and Hobby Lobby. It's super easy to use but after the first of the year I'll be looking for a supplier with a higher quality product.
But if you just want to do something today, this is for you. You could color it or add any scent you want. It would be a super kind of hand crafted thing to make and give in a hurry if you didn't add anything to it. Adding other things slows down the process a bit and if you want to add your own honey from your own bee hives you need to start beekeeping the year before.
Some of us are like that.
Or...you could just buy some local honey.
Then...
You break it up and melt it about 15 to 20 seconds at a time. You can also do this on top of the stove if you want. I try to heat it as little as possible to get the job done because I don't want to heat up the honey or essential oils unnecessarily. Honey and essential oils do not respond favorably to heat.
Once it's all mixed you pour the concoction into the mold of your choice. The possibilities are endless and limited only by your imagination. Okay, and whatever molds you can find. Here's how mine turned out and people really seem to like them.
Because BEES! Right?
If you give this a try let me know how it turns out!
Labels:
Skin Care
 Michelle is a beekeeper and master gardener. She writes and speaks about beekeeping, DIY projects, and how to live your best creative life.
Sunday, November 22, 2015
Pop Up Shop Recap and Gift Guide
Yesterday's pop up shop was a success. The rain kept me from having the bees clean up frames and getting to share that spectacle with friends and no one got to appreciate all my husband's hard work on setting up the outdoor space and making it gorgeous. But otherwise it was a great day. Here's a run down of what I was offering.
The things available will be changing seasonally so if you see something you want grab it while it's still here! I'm already working on spring and summer goodies.
The Honey Spice Body Butter is mango butter based and scented with blood orange and sage. You don't know whether to rub it on your skin or eat it. It was a hit.
The Zen Balm is made with lemon grass (grown on site) and green tea infused olive oil.
The Kitchen Sink Hand Scrub with sea and Epsom salts got its name from having everything in it but the kitchen sink. Bits of calendula and lavender make it beautiful and using it at after cleaning the kitchen would be a great end of the day ritual. Scented with rosemary and sage (grown on site).
Plus who wouldn't want to get this beautiful stuff as a gift?
The Fireside hand cream and lip balm are scented with five essential oils with a base of coconut oil and cocoa butter. The fragrance is your favorite cozy sweater, a bonfire, and a cup of spiced hot cider all rolled into one.
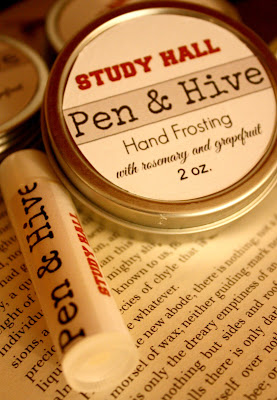
Did you know studies show the smell of rosemary increases your memory? Study Hall is scented with rosemary and grapefruit for a memorable uplifting vibe. There's a matching lip balm to go with it.
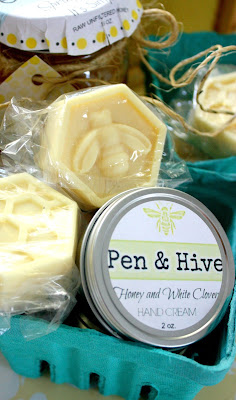
I love making these tiny little soaps made with goats milk and honey for gifts! It's really simple and I'll be posting the recipe sometime in the future if you want to try it at home.
I bag them in sets of 3 and sell them for five dollars.
Your Pen & Hive purchase always includes the gift wrapping! Who wants to mark shopping for the gift off the list and then think --Oh yeah I need to make another stop for a gift bag and tissue? No one that's who. Your wrapping includes hand stamped tissue paper and a hand made gift tag. Did I mention I am kind of obsessed with bees?
I want buying a Pen & Hive handcrafted item to be an event and a gift
Prices for these products run from five to twelve dollars. If you are interested you can email me at mkshort@hotmail.com or shoot me a Facebook message on my page. Please note that supplies are limited.
There is an online shop coming next year and a lot of other ideas in the pipeline. Stay tuned Pen & Hive family!
Labels:
Skin Care
 Michelle is a beekeeper and master gardener. She writes and speaks about beekeeping, DIY projects, and how to live your best creative life.
Sunday, November 8, 2015
Move Over, Wine. Local Honey is the New Best Hostess Gift
This post is for anyone who wants to trump even the best bottle of wine at the party. Showing up at the door with a jar of local honey will make an impression. It won't just join the multitude of homogeneous bottles on the table. It will end up in a special place in the kitchen. It's what your host will be eating the next morning while nursing a hangover. It's memorable and you will be too.
"Oh, you remember him. He's the one who brought the honey."
"Yes, of course."
How many times have you agonized over the perfect wine selection to take to your host only to find that it is taken from you and grouped together with cluster of other bottles on a table somewhere? Or worse, have you ever shown up with a fabulous bottle of Cabernet only to find out they don't drink? Or as happened to me, that they don't drink wine in summer.
Honey represents your good taste and your commitment to eating local. There are a myriad of flavors to choose from depending on where the hives are located. Still not good enough? Look for gourmet infused honeys like lavender or thyme. For extra drama and style points bring honeycomb. Lots of people have never tried it and eating it is like an event.
Combining it with other specialty items like tea or gourmet cheese is bound to make an impression on even the most serious foodie. They'll think of you every time they use it to sweeten tea or lemonade.
Get to know your beekeeper at the local farmers market. Chat with them about what the bees are foraging and where the apiary is located. You'll have an instant conversation starter at the party. People may not know as much about honey as they do about wine but they are fascinated by the bees and beekeepers. Everyone knows the bees are having a hard time but they may not have ever had real honey.
Want to sound like an expert? Then read my 31 Day Introduction to Beekeeping.
Want to see the honey process? Then read A Honey Season Start to Finish.
The beekeeper isn't quite as sexy as the vintner. I think it's the bee suit. Okay, it is definitely the suit. But throw around the words apiary and queen bee. An apiary sounds at least as romantic as a vineyard and every hive includes royalty.
Still not convinced that honey can beat out wine as your go-to party gift? Then go for mead. Mead is a fermented honey beer that has been around as long as wine. Again, you'll be the only one bringing it and it will stand out from the pack of wine bottles.
Cheers!
Labels:
Beekeeping,
Food
 Michelle is a beekeeper and master gardener. She writes and speaks about beekeeping, DIY projects, and how to live your best creative life.
Sunday, November 1, 2015
How to do Hand Lettering on Glass and Cottage Entrance Reveal
Nothing thrills me like a good makeover. I guess I just love possibilities. Optimism comes from not looking at what is but imagining what could be. Everything can be improved. The entrance to the Pen & Hive Cottage is a great example. For the 24 years since it was built the front door to the cottage looked like this:
I never actually thought about just how bad it looked until I was letting people in at my open house in August. It dawned on me how uninviting it looked. I added making it over to my list of things to do ASAP. I knew I wanted to paint around the door a color to draw attention to it and I knew I wanted to paint the door. It also needed a cute porch light. But I started by cleaning the window. To make that easier the door came with a little plastic grid to make the fake window panes. I popped it out. The second I saw what the door looked like without it I knew I wanted this door to look like the entry to a shop.
I should have stopped to take a photo of a more detailed before but sometimes once I start it's hard for me to stop and document every step...I went looking for a how to about lettering on Pinterest. I stumbled upon the trick for doing the lettering on the door at the blog, Paint and Style. Emma Kate posted the tutorial that I used to do my door in this blog post.
The only thing I needed to purchase for the lettering was a paint pen. This is the one I used. It was about 5 dollars at Hobby Lobby.
Next I used the same font as I use on my blog to print out the letters I needed. That way the blog, my cards, honey labels, and this door all have the same consistent look. After I printed them out I cut them apart per Emma Kate's suggestion so I could curve the name. Then I taped them and retaped them until I got them the way I wanted them.
The letters are taped on the front of the door exactly as they will look when you are finished. The painting is done on the back so you are tracing them in reverse.
I traced them with the pen and then colored them in. I also added a bit of paint brushed on where I saw that I had visible pen marks. Painting over it gave it a more solid and finished look.
All finished! Time to remove the letters and tape!
I couldn't believe how fantastic it turned out! I was super happy and just kept going back to look at it! This was a Pinterest win for sure!
In the collage below you can see the before and afters. I love the way the door looks without the storm door, but in this carport if I were to remove it I think the door would get dirty in no time. So even though it's adorable without it is serving a purpose. I used yellow to draw attention to the entrance and pale turquoise for the door keeping with the Pen & Hive colors. I found this adorable galvanized metal light fixture at Lowe's and hung a wire basket of moss and dried hydrangeas. I added a welcome mat that kept my color scheme going and put out a sign. Suddenly my husband's classic car looks like part of the decor!
Don't you just love it when a project turns out even better than you thought it would? Me too!
Labels:
Simply Home
 Michelle is a beekeeper and master gardener. She writes and speaks about beekeeping, DIY projects, and how to live your best creative life.
Subscribe to:
Posts (Atom)


