Thursday, May 31, 2018

How I Updated My Fireplace With Paint

warm silver

When you don't know what to do, paint all the things. I've lived by this motto for years. 

This week's goal was to stop the fireplace from looking like a giant black hole in the den. Caused mainly by the fact that it is a giant black hole in the den. But first, I found a picture of what it all looked like originally. Gird your loins, people. 


Yes. I do have a perm. When I see pictures from the 90s I realize I owe the 70s an apology. 

The den originally had dark wood paneling, red brick fireplace, and brass fireplace surround. The builder was all original like that. The mantle was brown and went all the way across before I had the built-ins installed 8 years ago. Which meant wasted space on both sides from the hearth to the ceiling. It was a tragic design obviously thought up by a man who hated his wife and created ugliness out of a dark place in his soul. 


Attempt #1: It makes you have all the sad feelings, doesn't it? 

 I painted the brick and won the war with my husband about the paneling. Okay, actually he just came home one day and it was painted. This is called the element of surprise. #guerilladecorating 

A few years later I had built-ins created on each side, repainted the brick and painted the fireplace surround black.  I also covered the brick, which was impossible to keep clean--see sad above picture, with broken red tile. I tried to match the floor as closely as possible. 

                                                                            
I'd been happily living with the previous update for a while but when the weather is cold we have fires every night. The painted brick had some smoke damage where there is a gap in the surrounding seal. Perhaps we should fix that. Also, I was really over the black. 

One more thing about the black. It is heat resistant paint for grills and fireplaces and perhaps furniture in hell. In 8 years it has not buckled, chipped, or flaked anywhere. But it's still black. 

Yes, I could have researched all the heat resistant paint colors but I already was in possession of a jar of Modern Masters Warm Silver. So in the fever of impatiently wanting a thing to be different, where I live about 97%  of my life, I painted it. 


It was beautiful. I gave it a couple of coats to thoroughly cover the black and with paintbrush still in hand, I added a little bling to the bronze finish lamps to help tie it all together. You know since there was literally not one even halfway shiny thing in the entire room except a sword. 

My husband may or may not have a slight War Between the States obsession. I should get something somewhat glammy at least since we sit in this room together in front of the fire to watch TV surrounded by war and death. You really can't do cozy without at least half of the Four Horsemen of the Apocalypse. 

Where was I? Oh yes. 

metal effects warm silver

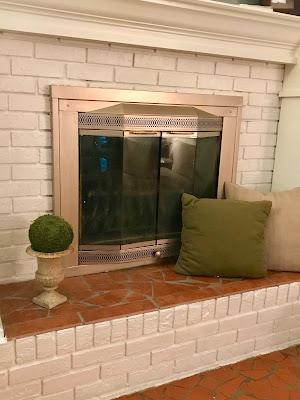
Here's how the fireplace turned out. 


The Warm Silver is really more of a champagne color. And who doesn't like champagne?


I have no idea how this paint will stand up to the heat this winter or survive the wear and tear of nightly fire building, but we'll see. I'll let you know after a few fires this fall. 


Until then I'm going to enjoy this beautiful fresh look all summer!

7/20/19 UPDATE:

After an entire fall and winter of having almost nightly fires, this fireplace surround still looks fantastic! The paint did not blister or chip at all. I'm kind of surprised because this paint isn't sold as heat resistant and I just took a chance. Remember though that I had previously painted it with heat resistant paint for grills That might have made a difference. 

Monday, May 28, 2018

Visiting Normandy Beach

normandy

A few years ago we were fortunate enough to do a cruise of the British Isles and the last stop was La Havre, France which is near enough to Normandy that we didn't have to think about any other excursion. It was a twelve hour day with an informative guide and lots of emotions. 

normandy beach

There aren't really any words to describe the feeling of the place. But my experience was profound in ways I didn't expect.  Beaches famous for fierce fighting and massive loss of life are now strewn with running children spending the day by the sea with sunbathing parents. Photos of beautiful landscapes marred by barbed wire. A carousel at the site of more heroic deeds and loss of life. 

 Arromanches-les-Bains (Gold Beach on D-Day)  

normandy beach

beaches at normandy


At Normandy American Cemetery

normandy

normandy american cemetary guidelines

american cemetary at normandy


 Omaha Beach. The tour buses are lined up and tourists, mostly of a certain age visit the site and read the memorials. Pictures are taken, with no one exactly sure whether or not it is appropriate to smile in them. It seems like a sacred place. 

d day landing site

Then just beyond where you see that stone monument, there are steps going down to the beach. It took me by surprise to see these happy French families enjoying a holiday, children running and playing, parents laughing, sunning. I stood on the steps and looked up at older tourists, mostly American, pointing and discussing the historical significance of the place. I looked down and saw what could easily have been any beach in the world. I wondered what those men who died here would think of that. I could imagine that they might tell us that was exactly what they'd fought here for. After all what better memorial could there be than those free French children? I couldn't help but think that if they are aware of it, it would surely make them smile. 

normandy invasion beach

 The following pictures are taken in and around the machine gun nest at Pointe du Hoc:

point du hoc

Everything about it makes it feel like what was accomplished here was an impossible task.

nazi machine gun nest

beaches at normandy

nazi machine gun nest

Almost...

point du hoc


Thursday, May 24, 2018

The Turkish Towel Revolution


Turkish towels have replaced regular bath towels at our house. Why? Because I got really tired of our bathroom smelling like a locker room at a high school with a plumbing problem. If you are throwing your towels in the machine after each use you are a better woman than I am. Plus I suspect you may not be showering as often as others wish you would.

In Memphis heat and humidity sometimes we take as many as three, yes three, showers a day in summer. Basically, if you step outside your house here in July you need another one. Sometimes I feel like I need another one before I even get out of the bathroom.

You can see why a heavy duty bath towel might struggle to dry in these conditions. Once they are damp they stay damp for a long time. Like until you wash and dry them.


Enter my quest for the Turkish bath towel. I kept hearing about them here and there. The main thing people kept commenting on was how quickly they dry. I did a little research online and placed my order. When they arrived I opened the package and they were beautiful! My husband picked one up and said: "This is a towel?"

I sensed a potential mutiny before I even finished getting them out of the package so I said: "You know how the bathroom smells?"

"Yeah."

"These are going to solve that problem."

Game over. 

Until he took a shower. He came into the kitchen where I was making a fantastic 5-course gourmet meal in full make-up with perfect hair --had you for a second, didn't I? 

"What's with these towels?"

"They are Turkish towels from Istanbul" This is the kind of exotic detail you can use to sell me anything but my husband doesn't care about adventurous textiles. Which doesn't bode well for my desire to actually go to Istanbul. Ticket for one, please. 


Remember when my husband was confused by my caftan revolution? 


Okay, so here's the deal. Turkish towels are not terry cloth. So they don't have all those little loopy things to hold water and it can take a minute to dry off. Imagine using a tablecloth. I'm not saying it's like that, but I'm not saying it's unlike that. Fine. It's exactly like that. But they do dry super quickly and are huge. Plus when I do pack for a trip to Turkey I'm throwing a couple in my bag to wear as scarves. 

More about what I might pack here. 

In my haste to see how they would look hanging in my bathroom, I didn't presoak them in cold water. A few days later when I got around to this it improved the absorbancy. Apparently, the cotton fibers need to bloom.

Here's the link to the towels I actually purchased, pictured. Classic Turkish Peshmetal Towels

Turkish Towel Cheatsheet:

Definitely soak them in cold water as soon as they arrive. 

Always wash in cold water to preserve the shape and color.

Do not use fabric softener on your TT. 

No worries. I think the last time I used fabric softener the royal bride was a redhead. Since getting these towels I have washed them in cold water and they didn't appear to shrink at all. The color also stayed true. And these were at the low end of the price scale. I like them so much I'll probably commit to pricier ones next time.

Have you tried Turkish towels? What did you think? What did your family think? Also, would you like to go to Istanbul? 


Monday, May 21, 2018

Using Native Plants in the Home Garden and Landscape


This weekend I volunteered at the Cooper Young Garden Walk in Memphis. The focus this year was on using native plants in the urban landscape and the featured speakers were Dr. Doug Tallamy, author of Bringing Nature Home and "local garden guru" Chris Cosby.

There were 89 participating gardens and 5 featured gardens listed as demonstration gardens. I was a volunteer at two of them and it's always fascinating to see how different people create vastly different gardens with different goals in mind.

Image may contain: plant, tree, outdoor and nature


I have to admit that I like a certain amount of tidiness but as a lifelong gardener and nature lover, I am keen to create an outdoor space that is a real garden and not just landscaping. As suburban lawns go we have very little grass, choosing instead to allow a bit of wildness around the edges. There are weeds. My standard for a naturalized feel is that it needs to look like it was done on purpose and that there is some design in mind. I like things trimmed and purposeful looking. Unkept things can easily make your home look uninviting or even abandoned. Like most other parts of my life, I am on the constant quest for balance. Here's a picture of my front garden on the left and the backyard on the right.


Read about my quest for balance indoors and out. 

How can you make the best use of your space to enjoy yourself and also support local wildlife and be part of the solution to disappearing habitats and a host of other issues like water run off?

We do like some lawn and weed free gardens. So what does it mean to use native plants in the landscape then? And more importantly why bother?  If you are wondering where all the birds have gone or why you don't see fireflies in the evenings anymore, the answer may lie in modern landscaping practices. Pristine lawns and non-native species don't support the insect populations necessary to sustain birds and their offspring.

Click here to watch a 2015 talk by Dr. Tallamy explaining how and why we can all do better. 

When we moved in 26 years ago our lot was all lawn with the exception of pine trees at the edges and a small rose bed in the center of the backyard. Over the years we have added trees, shrubs, gardens, as well as compost areas, a rain barrel along with chickens and bees. I've dug up grass from large areas to plant gardens and slowly over time watched our wildlife numbers increase dramatically. I now see things I have never seen before in my life like nesting bluebirds and a bumblebee nest along with countless varieties of bees and insects. We have many species of birds. There are skinks, tree frogs, bullfrogs, and toads. And of course countless squirrels and chipmunks.

Read What to Plant Now to Help the Pollinators.

pollen
                                                           

When our neighborhood was built in 1966 the old farmland was flat and devoid of all trees save a few. Now 5 decades later we have otters and blue herons fishing in the creek behind our house. Not over landscaping or using fertilizers and pesticides on our lawn also means that we aren't contaminating that waterway with toxic runoff.

Just adding a few native plants to your landscape would aid the insect and bird populations tremendously. Saving the world can seem overwhelming, but planting a few native plants? Sure. I think we're all up for that.

Thursday, May 17, 2018

Blogging Summer Schedule


A few months ago I committed to blogging 3 times a week to create a more consistent body of work. I'm going to be posting twice a week during the summer because...summer...and also because I have several other projects I'm working on.

Yes. You know that floor is one of them. I'm getting close now, y'all. I'm thinking next week I'm going to get it done. Actually moving furniture today. I'd planned on this week but the air in the cottage went out and hello, sweltering Memphis heat.

 I thank God every day I wasn't born before air conditioning and epidurals. 

When y'all see how small this floor is after all my whining I expect you to laugh hysterically and call me names. But, you know, in a good way.

Where was I? Oh yes. SOOOO The summer schedule will be:

New posts on Monday and Thursday. 

Instagram will still show up on the daily along with Facebook updates because my life is mesmerizingly fascinating. I mean I'm pulling up nasty carpet and cleaning out the chicken coop. How can you not read about that?

While we're on the blogging topic, what do you most want to read about? Bees? Garden? Decorating? Making over furniture? My hair? (Because y'all. My hair is totally the bomb --do people still say that?--right now thanks to a great new cut my stylist gave me.)

So let me know what you want to read about!

Also, do you have questions? Ask 'em!

Monday, May 14, 2018

Check Out My Bumblebee Nest And Learn What to Do If You Find One


I have a bumblebee nest in my potting shed. As a beekeeper, I'm pretty knowledgeable about honeybees but I had to read up on bumblebees, their behavior, and nesting habits. First, let me tell you that bumblebees, unlike honey bees are native to North America. So they are vital to the environment along with carpenter bees and the 4,000 other species of natives. Honeybees brought here by the Europeans were introduced to provide the colonists with honey and beeswax. They are vital to our food supply but actually compete with native bees for resources.


Bumblebees are amazing pollinators so be kind to them when you come upon them in the garden!

Here's a video of the nest. You can see the queen bringing pollen into the nest to prepare for laying eggs. Once her offspring hatch, which takes about 21 days, she'll no longer leave the nest but stay inside laying eggs. Good thing I caught her on this video!


Unlike honeybees bumblebees nest under the ground usually but one particular species, Bombus hypnorum or Tree bumblebee, nests in birdhouses so I'm fairly sure that's what we have here. After hiving my very first bees I hung the swarm box up in the potting shed where it's been for 6 years. This box is about 5 or 6 feet off the ground and contains an abandoned Carolina wren nest. This box is how bees are shipped through the mail. Let's just say when it contains 10K bees the postal workers are most eager for you to arrive and retrieve your package!


Compared to the 60K-100K residents a honeybee hive might contain a Bumblebee nest is made up of around 50 to 400 bees. Since this nest is in a high traffic area during summer I'm hoping things stay on the smaller side. While male honeybees cannot sting and the females are far less defensive than honeybees or wasps they can sting if the next is threatened so I'll be giving these bees as much space as I can despite the fact that they have made themselves at home in a busy spot this time of year. Being careful not to get too close or breathe on them seems to be important.

I'm moving a few garden tools out of the way today so as not to disturb them. Read about other residents of the potting shed in All Things Great and Small Love a Potting Shed.


Everything about this nest meets the requirements I read about for the Tree Bumblebee: an old birdbox or nest, 5 or 6 feet off the ground, a shady corner out of the day's heat and direct sunlight.

I have to say I'm very excited about having bluebirds and bumblebees in the same year!

I'll keep you posted on what happens with them but if you'd like to know more check out Bumbleebee Conservation. Org

What to do if you have a bumblebee nest:

Quite a few of you have contacted me with questions about how to deal with the nests at your homes.
Here's the buzz on that. (sorry I can't help myself)

1. Remember that bumblebee nests don't last long, unlike honeybee colonies. The bumblebees all die before autumn, with the exception of the queen.

2. It is likely that if you don't disturb them they won't bother you at all.

3. Remember that while bumblebees can sting they are far less likely to do so than ground hornets or wasps.

4. If you can see where the nest is avoid spraying chemicals near it or mowing over it. You don't want to disturb the next but you also don't want to stir them up.

5. If they are in a truly undesirable location you can place a board or other object like a plastic container cut in two to redirect their traffic.

6. If it's absolutely necessary you can attempt to move the nest, at night, while wearing protective gloves and long sleeves. Only half of bumblebee nests are successful so this is, or course, a last resort.


Wednesday, May 9, 2018

Turning a China Cabinet into Gustavian Style Accessory Armoire


When I originally did my Scandinavian inspired bedroom in 2013, the burlap covering the glass on the china cabinet went along nicely with the burlap curtains I hung.


On the left you see how it looked when I inherited it. On the right after its first makeover.


I recently replaced those burlap panels with plain white ones from IKEA and the burlap on the cabinet now looked really farmousy. Not the look I was going for. Plus I just really wanted an excuse to play with the look of Gustavian Furniture.

Plus I wanted to feel fancy by saying "Gustavian Style Accessory Armoire."  It's the same reason I call my herb garden and lettuce patch a "potager." 

This look is named after King Gustav III of Sweden. He traveled to France and was heavily influenced by the Neoclassical and Rococco styles he saw there. He brought them back to Sweden in the 1700s where they were simplified into what we know as the Gustavian style today. That explains why as I was painting I kept asking myself "Is this too French?" I felt like I was walking a very fine line. I could just have easily asked "Is this too fancy?"

The Scandinavians shy away from anything over the top. So yeah, they're pretty much nothing like the French. Though when you see a portrait of Gustav he totally looks like a fancy pants.


 The first thing I did was to paint the inside of this piece with Annie Sloan's Antoinette. I keep using this sophisticated pink around the house in small doses to add an air of feminine fun. It was ideal for the little space where I keep silk scarves, vintage beaded clutches, and jewelry. I love using vintage china or silver serving pieces to hold bracelets and necklaces.


A few days later I started on the outside. Now in its first makeover I confess to having used spray paint--GASP-- I know! Are you okay? Go get some water and come back. 

I was doing a whole room at once and was in a hurry to make it all look cohesive. And it was fine for 5 years! But recently I've been looking at it and thinking it deserved better with its cute little details and vintage charm.


I didn't have an acutal inspiration piece but knew I wanted it to be blue and white with some very subtle gold details. The word that kept coming to mind was dreamy. I wanted it to look wispy, almost like if it were in a watercolor painting of the room.

 Oh, is that all? I mean how hard can that be?

For the white I used Pure White over the spray paint.

In the detials I painted Modern Masters Pale Gold with an artist's brush.


For the blue areas I mixed Pure White with Louis Blue. Then I sanded back the high spots to expose more white. You know I make this up as I go along, right?


I waxed with clear wax and then added white wax to make it all look even more dreamy. The thing I noticed about trying to achieve a Gustavian style finish was that I kept feeling like I needed to tone it all down. I wanted color and detail but it all had to be subtle. The white wax went a really long way toward achieving that unique Scandinavian look.

For an aged effect I added some Annie Sloan Dark Wax in the crevices here and there.


Hardware: This time instead of removing it I painted lightly over it and then wiped back the excess.


THE DOOR:

I removed the burlap from the glass and was in the process of popping the glass out so I could paint the door when the glass broke.


sigh. 

Now, I'll be honest I was thinking about doing a mirrored effect on the glass which I was concerned was going to push the envelope way over toward French inspired. So when it broke I was all like, meh. But then it was a hassle to drag my butt to the hardware store to have them cut a piece of wood to fit. I decided to make it a little bit less finished than the rest of the piece. For some reason I wanted the door to look like an older painted finish. It's a hair thicker than the glass so all the molding that held in the glass didn't fit over the thicker piece of wood. I ended up tacking it in and covering the ugly nails with upholstery trim.


Normally for projects I give little thought to things like the inside of drawers but for this project, which I think of as a little jewel box, I went all out and even painted the inside and  outside-- who am I right now? --of the drawer.


Y'all! This beautiful liner paper is from the dollar store! Again, getting really close to looking French here, but this is the liner paper in every drawer in my house except the kitchen.


 Look how how much this picture looks like a watercolor! Mission accomplished!

I am so happy with how this little cabinet turned out! It's a perfect fit for the bedroom. I still wanted it to be white but not WHITE. The color is subtle but echos the blue accent wall. I love that when I open it up to grab a piece of jewelry for the day it is secretly all girly and feminine on the inside.


Who says a china cabinet has to be used for china? It's your house. Do what you want.