Friday, July 31, 2015

Blog Obituary: RIP Professor & Housewife

A few of you may have followed off and on over the past five (5!) years the other blog I kept called, The Professor and the Housewife with a distant blogging partner. Can you guess which one I was? It was a discussion that grew out of one conversation on a bus in Italy somewhere between Assisi and Rome.

For a minute it seemed like everything was possible.

Okay, that sounds melodramatic and winsome.  If you have ever started a new venture you know what I mean. We'd take the blogosphere by storm! Readers would comment and argue and debate and we'd be leading the charge to civil discourse. We'd do that small thing romantics often dream of--we'd change the world.

Our blog was well tended. A fat spoiled intellectual love child I liked to call Junior. As in, "Dear Professor, I'm traveling to Greece could you tend Junior in my absence? And don't forget to update his Facebook page, he'll be cranky." You get the idea.

We thought we were fascinating ( people always do, don't they?) but few people read it. I now know a few reasons why that I didn't understand when we started. All the cliche ones about reading and commenting on other blogs and using images or solving problems turn out to be true. We didn't solve very many problems--we attribute this (in all humility)-- to a lack of minions. Minions being essential for world changing and/or domination. We were however brilliant (ahem, to our own minds) and tireless in pointing out the problems and yes, occasionally we even recognized our own contributions to them.

So was it worth it? On every level...yes. Nothing will make you rethink all your ideas and opinions like sitting down every week to defend them. Many times what I really thought about an issue only became clear to me as I was writing about it. Having another person call you on sloppy thinking and faulty data will find you soon fact checking everything. Please note that doing this with friends and family on your phone under the table while they are speaking is somehow considered rude (go figure). Publicly saying what you think about politics or religion will ensure that you have some pretty damn good backup for why you think and believe what you do. Our original motto was "Truth springs from argument among friends." We still believe that. But for it to be productive you have to care more about the relationship and the other person than about being right. We sincerely hope you have friends who you can argue with on your way to truth and better thinking.

So Junior is dead, killed off in the end by his inattentive mother. For future reference you might want to know that if you let your Go Daddy account lapse they'll store your stuff for 30 days and then ...poof! They delete it. In my hard drive (where a blogging mom's heart is) live all the words recorded over the last few years. So be on the look out. Junior may haunt us in some other form in the future. He might show up as a book or another blog somewhere down the road. Until then, try and remember him and honor his memory by keeping all your debates and discourses civil. Listen to the other side of the argument. Learn something new.

He would have liked that.


Wednesday, July 29, 2015

Home Recycled: 31 Days of Simple Projects.


Welcome to Pen and Hive and the series, Home Recycled! I'm on a quest to declutter, simplify, and make the best use of what I have. I'm over being enslaved to the tyranny of new. If waste makes you cringe and if you have more imagination than money then welcome home.  Scroll past the list  to read the post for day one. This is a rework of the original post from my other site so just excuse all the old Restoration Spring watermarks on photos.

2. The Home Recycled Philosophy
3. Less Is More: How I got Here
4. The Rules
5.The Real Purpose of a Yard Sale
6. Home Recycled Field Trip
7.Repurposing a Dresser
8. A Room of Your Own
9. Framing It
10.Naturally Free Decorating
11.Let's Talk Chairs
12.Tools of the Home Recycled Trade
13. Style Influences
14. Two Dollar Insect Art
15. Displaying Collections: Your Home as Storyteller
16. Composting to Reduce and Reuse
17. Makeover Time Table
18. Table Top Clock Part II
19.  Making Over the Kitchen Island and Using Scrap For Trim
20. Salvation for Cute Candle Containers
21. Recycled Ideas for Walls
22. From China Cabinet to Accessory Closet
23. From Drop Cloth to Drape
24. A Dresser Mirror Stands On Its Own
25.The Recycled Wardrobe
26. From Beer Bottles to Juice Glasses:Recycled Glass
27.Recycled Post on Recycled Glass in the Kitchen
28. Easel Rescue and Makeover
29. From Lampshade to Wreath
30. Why Stained Paint is My New Favorite Thing
31.Home Recycled, Always, The End


 I love this idea from WWII. Make do and mend was a popular slogan but I'd never seen this one. Renovation helps the nation. We could add that it helps our finances and the planet. And it appeals to those of us who want to live a simpler, slower, saner life. It encourages creativity and imagination. I never get the satisfaction from purchasing something in a store to decorate with that I do when I put interesting objects on display or makeover a piece of furniture that someone else tossed out.

These projects and ideas are going to appeal to people who want to create interesting and inviting spaces to live in,  who want to express themselves through design, or who want to salvage beautiful and well made things from the past. Those who want a home with some character where everything has a story. Don't get me wrong, it's not that I never buy anything new, but am so much more deliberate about it than I used to be. Part of wisdom is knowing where it's okay to let yourself spend extra. Where I've purchased new I'll point that out. Along the way please feel free to comment and share pics of your favorite recycled piece from your home!

Tuesday, July 14, 2015

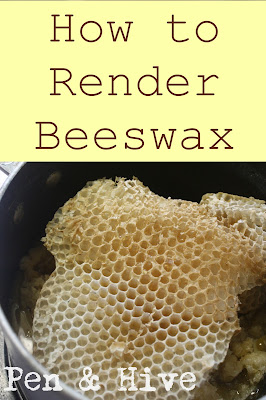
How to Render Beeswax

rendering beeswax

It only took me six months to get around to it. That's because all the websites I visited to learn about how to do it equated the danger level of melting  beeswax to cooking meth. So yesterday while my husband was out of town I figured if I burned the place down I'd be the only one here.


It's a pretty simple process. In this pic you can see the honeycomb as it is after the bees clean it up (after I process the honey I put the comb back out near the hive and the bees collect all the honey I missed and take it into the hive to store for winter) during harvesting season. 

I've crumbled some to help it melt faster.


 The pot was full when I started. It took about 30 minutes over low heat for me to melt it down. When completely melted the pot was about 1/4 full.


There are a few dead bees and some debris mixed in so after it's melted you strain it through cheesecloth. Make sure to use something you only intend to use for beeswax after this. It will be impossible to clean.


Collect your containers to pour the strained wax into.


I heated the bowl I was going to use for straining in the oven first, to keep the wax from hardening so quickly.


Once you've strained it, remove the cheesecloth, and pour it ASAP into the containers. Even though I heated the bowl you can see how much had hardened in the ten seconds it was in there.


I threw the used cheesecloth into the pot while it was still on the burner to mop up the excess wax. I'll use this for a firestarter in the fireplace.


I thought it was kind of funny that the imprint on the wax discs was the recycling symbol from the bottom of the containers. This is my favorite recycling project ever.

Sunday, July 12, 2015

Beekeeping 101: Equipment


 If you are going to start keeping bees you'll need some basic equipment. If you pick up a catalog or attend a meeting of beekeepers you are going to hear some terms that sound confusing. Things like "hive body" and "super". Here's a simple explanation of what's what. In the picture above you can see hive bodies. The bigger boxes on the bottom. On the top are shallower boxes called honey supers.


These are frames. I run 10 frame boxes but 8 frames would be easier for me to handle since they'd be lighter when full of honey. You can see on the frames that the bees build honeycomb and fill it with either brood, pollen, or honey. The frame below has an example of all three.

Read more about what you'll find inside the hive.


Below you see the inner cover. which you put on your hive body or honey super.


Over the inner cover you put the outer or telescoping cover which sounds a lot fancier than it is. It has metal on top to protect the hive from the elements. Here's what it looks like all together. The entire hive rests on a landing board. There are several variations of this.

Read the story of an entire season!


Finally, you will need tools necessary to beekeeping.


Last and most importantly you are going to need protection. Getting stung hurts and I want beekeeping to be enjoyable more than I want to look cool. In the picture you can see both kinds of popular veils. There are several variations of all of these.


The cost of start up equipment is going to be around 500 dollars. I started off with a kit that included the basic hive, smoker, veil, gloves, hive tool, and bee brush for about 120 bucks plus shipping. The bee suit and veil I'm wearing in this pic were $65.00. You'll purchase extra equipment as your colony grows and most beekeepers advise starting off with two hives in case something goes wrong. Your first swarm of bees and queen will run about a hundred dollars. 

Read about putting the equipment together here. 

Don't let the cost prevent you from taking up this hobby if you want to. Remember you'll be able to offset part of the expense by selling your honey. Compared to something like golf which just costs money it's inexpensive. And you'll be creating something of value as well as helping save the planet and our food supply in the process.


Monday, July 6, 2015

Harvesting Honey 101

beekeeper suits

One of the perks of being a beekeeper (in addition to having something to talk about at parties) is the honey. But let me tell you if you are thinking about getting a hive or two, the collecting is a lot of work. you'll sweat buckets and smell like honey and smoke when you are finished. That's why when a young adventurous friend, Katie, who writes a blog about living in Spain called Suitcase Lioness, volunteered her services as a bee intern I jumped at the chance. It takes a special kind of person to be willing to wear something that looks like some NASA astronauts went to clown school. Beekeepers are a quirky bunch.

 Read about that time I had a bee in my bonnet here.

This is a harvest of spring and early summer honey. Swarm season is officially over and I've got three first rate queens laying away. So how do we know when to harvest the honey? Here is what a frame looks like when I put the super (a box containing ten frames) on. The frames I use have a plastic foundation which the bees will cover with honey comb.


The first job the bees have to do is make honeycomb to put the honey or brood in. We call this drawing out. This is a frame in the honey super so I have placed a queen excluder between the brood chamber and this box. As soon as they get some comb built they start filling them with honey. Here's a post about identifying what's on the frames.


In the picture above you can see the wet honey in the cells and then on the right you can see some honey they have capped. This means that the bees know that the moisture level in each of those capped cells is perfect (around 18%). Once sealed the honey will basically last forever.


 Read about Catching My First Swarm!

I check the hives every couple of weeks waiting for almost all the frames to be full of honey. The super full of frames that weighs about five pounds when I put it on there with one hand will weigh a good thirty pounds when full of honey. Once I see 90% of the frames are capped I add the bee escape board. You can see the top of it in the pic below. It's got a sort of a maze on the other side and once the bees go back down into the brood boxes they can't find their way back into the honey super. Unless you leave it on more than a couple of days. Those girls will figure it out because they are on a mission to get back to work up there. Some beekeepers use fume boards to drive the bees out of the supers. I am never using any chemicals in these hives. I want to be able to assure people who buy my honey these hives are completely chemical free.


Once the bees are out of the super it's time to harvest! For a post covering an entire season with more pictures read Honey: Start to Finish


 In the picture above you can see how many bees were trying to figure out the maze when we opened the hive. And below how quickly they disperse to go about their business. We are looking at a frame that is about half capped.


Almost every frame was capped all the way to the edges so this was a great harvest. The intrepid Katie, got to take it to the honey kitchen and jar it up herself to serve to visiting friends this week. As a beekeeper this is my favorite way to enjoy honey, scraped right off the frame and into a jar. It leaves no doubt that you are getting 100% pure raw unfiltered honey.

And in Katie's case, bragging rights.

Special thanks to my son, Jared for offering to photograph our escapades!