Sunday, August 27, 2017

Platters in the Garden Because Downcycling is a Thing


Somehow I ended up with several platters. Even after getting rid of some a few years ago I still had three or four I just loved looking at! If you have been reading a while you know there is a kink in my minimalist chain. Read about my ongoing struggle with stuff here and here.  It's how much I love the cottage look.

Dang it. 

I love decor that looks collected over time, casual, not contrived. 


Anyway, platters. I had three blue and white ones on the wall in my guest cottage. I loved everything about this, but mainly the fact that the bunny on the left is eating out of a blue and white platter!

It's overload I know. Sometimes I just can't help myself. Please tell me you can relate. 

I finally found a platter solution at a local shop. The owner of Me and Mrs. Jones had created a wispy wall of platters casually drifting from the bottom left to the top right. It looked random and genius. I thought a similar idea would look adorable on the outside wall of my tool shed that faces my beehives and chicken coop.


The ultimate farm to table nod for a kitchen garden. 

I went around the house and found all the platters I had and hung them up, except for a lovely one that my sister sent me many years ago. The collection was a little sparse. I found a couple at thrift stores. Then I helped my neighbor clean out some stuff in his garage and he shared 3 more with me.

I love that they are random.

A couple have flowers.


There's one cow and this adorable sheep.


Some blue and white.


I used some small platters to fill out the area where I wanted smaller items to drift up.


Those little plate hangers add up so I eventually used some copper wire I had on hand to make my own. I think I actually like the look of this better for a garden. I love that it looks hand made, cause it is, and doesn't look fussy or over thought.


I hate fussy and over thought.  

Y'all! This is making me so happy! I have been looking for the perfect thing to put on this wall for years. Not even kidding. Years. This got some more stuff out of my house and I can see them and enjoy them everyday. Who knows! I may even yank one off from time to time to bring in something from the garden!

You know what I really need is a garden sink...

Hmm...


Friday, August 18, 2017

Back Porch Makeover


I painted our concrete screened in porch floor about 15 years ago. I should probably point out that I did a pretty bad job. My husband was out of town and I was trying to do it start to finish while he was away, you know just to avoid the "What's wrong with the way it is now?" question that men like to ask when they think something will be inconvenient. There were heavy things I couldn't move alone, the downside to guerrilla decorating. The faux rug seemed like a good idea at the time...


 After all this time it was looking pretty rough. Here's a tip, if you have a metal cabinet outdoors place it on something! 


 But also in all fairness, I'm just impatient. When I am so close to putting things back and seeing how the finished project is going to turn out it's hard for me to restrain myself for hours, let alone days. When you are doing a project like painting a floor that you are going to want to stand up to wear and tear over time, self control is your best friend.

I'm literally so impatient I could not stop myself to take pictures during the process, so what we have here is before and after only. 

The first step in this process is a trip to your hardware store and a discussion with the person in the paint department. I would have chosen the wrong paint if I hadn't done this. My porch had been painted previously and was chipped and peeling in a few places. Those details helped him recommend the right paint for the job. Even the type of paint I had used previously was important.
And measure your space before so you have the right amount of paint. I assumed it would take two gallons but the paint expert assured me it was a one gallon job. He was right and saved me having to return an unopened can later.  If it's right off the shelf make sure to have them shake it up for you.

After returning home with your paint thoroughly clean the surface. I removed everything from the porch and scraped all the loose or chipped paint. I swept it thoroughly with a good broom. After that I used the shop vac to vacuum any remaining dirt from the entire surface.

Cut in around the edges. Since you are painting a floor and not a wall, doing it in reverse isn't an option. You are going to have to stand somewhere.

Screw a mop or broom handle on to your roller for this project! 

At this point I was so giddy about spilling the paint on the floor I didn't stop to take pictures. This is one project where you can forego the paint pan and just pour the paint on the floor. Paint as you would a wall. Don't forget painting yourself in a corner is a cliche for a reason. You want to start in the far corner away from the door and paint yourself out of the room.

Now comes the hard part...waiting. The paint will be dry to walk on in 24 hours. It will be inconvenient. For us it meant having one of the dogs break loose and run down the street while we were going around the house to avoid walking on the wet porch.

After you have waited your entire day to walk on it you are going to start imaging where you want the furniture to go.

STOP.

This is the biggest lesson I learned this time around. There is a big difference between dry and cured. Dry means the surface is dry to the touch and not tacky. Cured means the paint has hardened all the way through and when you press it with your fingernail, it won't leave an indention. Depending on the paint, surface, and environmental conditions, this process can take up to 30 days.

That's right. Thirty days.

Because of this choosing when you are going to do this project is of the upmost importance. I would never have dreamed I could do this in August in Memphis because of the oppressive humidity. But I saw in the forecast that we were having a week of unseasonably low temps in the mid 80s and dryer air. So I pounced on my opportunity! Here's how it turned out!


In the background of this picture you can kind of see all the stuff that was on the porch piled up on the patio. Obviously I couldn't leave the stuff out there for a month waiting for the paint to cure. So I googled what to do and everyone said to wait as long as possible to put furniture back.  In the meantime I noticed how bad the walls looked and painted them a stark clean white.


 If you just can't wait you should place the furniture on wax or parchment paper folded up to protect the paint while it cures. I painted the porch on Saturday and put my furniture back on Wednesday.


 For my husband's weights and the deck box where we store unopened bags of dog food I used a cheap beach mat from Lowe's that I had on hand. It also helped define the area.


This is an old cedar chest without a lid where we keep firewood in the winter. Right now I'm using it as a catch all. But look at that gorgeous floor!


I was finally ready to get to the fun part!

Arranging furniture...


Adding plants and accessories...


Every plant gets a waterproof container underneath!


You have to have someplace to place your coffee...


Finally, a fun piece of art for the wall finishes off the space.


All that's needed now is a book and a glass of lemonade. Happy porch sitting, y'all!


Thursday, August 10, 2017

10 Things to Do When Planning Your Pollinator Garden

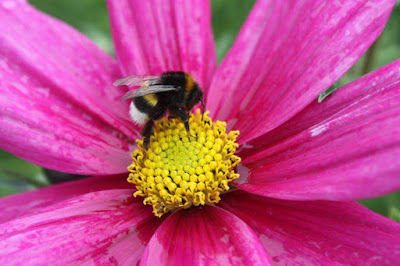
bee on flower


Usually around this time of year in the garden I start thinking about what I wish I had done back in the spring. This is a great time to look around the yard and garden and begin making a plan for next year. Here in the south it allows you to take advantage of beautiful upcoming fall days to get the laying out and soil prep done. 

Did you know digging in the soil can make you happier? 

 In a previous post I recommended planting a pollinator garden as another way to help our buzzing friends. If that's how you choose to be part of the solution you may be wondering what to plant that would most benefit the bees in your area. Here are some tips to help you get started once you have decided to make part of your yard, garden, or balcony a friendlier space for bees. Read about a day in a bee's life.

pollen

What to Plant

1. Plant colorful showy flowers. Bees are attracted to flowers with bright colors, particularly those in the blue violet range of the color wheel, along with white and yellow. They don't see red but plant those if you like for the butterflies and hummingbirds. Good examples are bee balm and Russian sage

2. Plant flowers that have one large blossom so that the hefty bumblebee can land on it securely. Think of sunflowers, zinnias, rudbekia. And plants that have tiny flowers for small bees. I like lamb's ear and salvia.

3. Plant plants that have hollow stems. Many varieties of native bees are solitary and nest in holes in the ground or in hollow stems of plants. All of the brambly canes like raspberry and blackberry are wonderful choices along with many types of ornamental grasses. 

4. Plant types of flowers in big patches. This helps increase the bees' foraging efficiency. 

5. Use low maintenance plants. The less we disturb a pollinator garden the better. This is not the place for plants that need deadheading and pruning. My favorites are bee balm, coreopsis, and many types of herbs like oregano. 

6. Plant for consistent bloom. As soon as bees emerge in the spring they need nectar. After the big blooming season of spring and early there can be a dearth of flowering plants. Add things that bloom in late summer and early fall. Where I live narcissus, forsythia, and apples bloom very early. My absolute favorite for late summer to early fall are garlic chives which have white blossoms and do a wonderful job of providing nectar in that late summer dearth. 

7. Plant flowers that have single blossoms. Many of the big showy double blossomed hybrids cultivated for enjoyment in the garden have little or no nectar for bees.

alaskan dandelion


Other tips

8. Garden, don't landscape. Don't mulch or use weed barrier everywhere. 70 % of native bees nest underground. 

9. Don't use chemicals. Even if you end up with a few weeds it's okay, they are bee friendly. Bees actually suffer when weeds are completely eradicated.

10. Leave stalks standing overwinter. For those bees that like to nest in hollow stemmed plants it's important to leave them a place to hibernate and nest next spring. 

With the loss of native habitat to bees happening all over the world it is more important than ever to garden with them in mind. Planting one or all of these plants is a great way to help them in their time of need whether you are doing it in a spacious backyard or in a container on your apartment balcony, every pollinator friendly plant matters now.

Now when those garden catalogs start showing up next January you'll know what to do!