Monday, September 30, 2019
The Real Magic Behind a Vision Board
There's a lot of talk swirling around vision boards and what they can do for you. How does this crazy thing even work? Is it a mind hack? Is it mystical? Is it subliminal messaging? It may be all of those things or none of them. Depending on your intent.
Is it weird to use this if I'm a Christian?
If you have ever written down a Bible verse you wanted to focus on and put it on your bathroom mirror, you've already done a version of this. You are just replacing the words with an image that represent what you are trying to achieve. Put the verse with the image if you want.
You only have to think about how much money is spent on advertising by people trying to sell us things and think their thoughts to realize the powerful effect images have on our minds.
No matter what you believe, the one way to ensure your vision board works is to allow it to be an inspiration to work.
If you think it's just a bunch of woo woo then think of it this way:
The truth about vision boards is that seeing your goals and desires every day inspires you to get to work on them. It's the picture version of your favorite motivational quote. It's your Pinterest call to action.
Even if you aren't consciously thinking about working toward your goals every minute of the day seeing your vision board sparks subconscious activity that leads to ideas about how you can make those pretty pictures a reality.
While writing down your goals and planning what you want your life to look like on paper is a good thing and something I definitely do, creating a vision board version of all those same things is...
P-O-W-E-R-F-U-L!
But let's be clear. Sitting around all day staring at your vision board and wondering why you aren't living the life of your dreams is just flat out crazy.
Girl. You gotta do the work.
Your vision board invites and inspires you to get to work to make the desires on that board come to life.
So let me be clear. The world responds to action. The thinkers and dreamers are a dime a dozen. Everyone has a great idea for a book. Everybody knows what new business would be a huge success. Every single person has an idea for an app that would make millions.
The DOERS OWN THE DAY.
So think of your vision board as a beautiful call to action.
What small steps can you take today to move you in the direction of any of your goals you see there?
Labels:
Getting it together,
goals,
Inspiration,
lifeprint,
motivation,
vision board
 Michelle is a beekeeper and master gardener. She writes and speaks about beekeeping, DIY projects, and how to live your best creative life.
Monday, September 23, 2019
How to Stencil a Concrete Floor
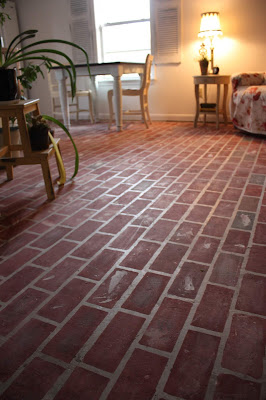
I've always wanted to do a painted floor with a brick stencil. I finally had the opportunity to do that in the Pen & Hive Cottage last spring when we had the carpet and linoleum I had ruined with honey and beeswax ripped out.
Insiders tip: Beekeeping is a super messy hobby.
I needed something indestructible because this is a workspace for me.
I ended up paying someone to rip out the old flooring because I used to think that stuff was fun and I was too cheap to pay anyone to help me. My 34-year-old self was like "Oh, my gosh! you'll charge me how much?" My 54-year-old self says "Do you take Venmo?"
I couldn't really explain my plan for the stenciled floor in a way I could get my husband to understand. Mainly because he kept trying to buy me a new floor and I kept saying no. Let's just say this is not usually how those conversations go.
Pre-Project Info:
If you need to get this done while your husband is out of town read Guerilla Decorating: A 5 Step Guide to Decor-Revolution.
If you missed my post about prepping to paint concrete, you can read it here.
An important part of the prep is definitely going to be creating a sample board to nail the color combo down. Obviously so you can then completely ignore it.
When I imagined doing this project I envisioned a regular size paint roller on the end of a pole where I would knock out this floor painting business before lunch. Oh, wait. I forgot who I was. I should have known I would want to paint each individual brick a different color to achieve the most realistic look possible.
How to Paint a Faux Brick Floor:
Note: If you were painting a floor all over for a smooth finish the prep work would be much more intense. For this project, I used the imperfections to mimic actual brick. Plus I do not like intense but can completely get behind imperfect.
1. Clean and prepare the surface. This includes using premixed concrete to fill holes created when the carpet was removed. Sand the patches smooth after they dry and sweep up any dust and dirt. I swept and then used a shop vac.
2. Lay out the stencil according to your design. For this floor, I wanted an edge of straight brick which I thought looked more authentic than a brick pattern that just disappears under a wall.
3. Choose and mix paint colors. This depends on the color of brick you are trying to recreate. The outside of our house is red brick but I wanted a good bit of pink to tie in with the cabinets and countertops. The base color was Jolie Terra Rosa, with hints of Sage, Legacy, Palace White, and Rose Quartz. Have y'all figured out that I'm just making everything up as I go along?
4. Hold your stencil in place with painter's tape then use a roller to apply the paint. A big one if you are normal. A tiny one if you are trying to recreate each individual vintage brick you have ever seen. Because the bare concrete is so absorbent I was able to skip the normal offloading technique which is stenciling 101 and go straight to the concrete. I painted the center of the bricks first (offloading a lot of paint) then worked toward the edges to keep paint from seeping under the stencil
5. Distress. When the basic painting was done I flicked paint, mixed up a whitewash and spread it out in various spots to mimic extra grout, and sanded to achieve a flat clay like finish.
6. Seal with a concrete sealer if desired. I am so happy with how the faux brick turned out and I don't want to ruin it by adding shine. I'm on the hunt for a completely flat/no shine/matte sealer for concrete. I mean let's just toss aside the idea that the point of redoing the floor at all was to seal it and make it durable. It's been six months and the more worn it gets the better it looks.
7. Enjoy your new floor! Because Jolie paint dries on concrete so quickly you can replace furniture and walk on it the same day. Actually, you can walk on it pretty much immediately. Remember when I painted the porch and it took days to dry? Not this time!
Note: for all of you people I see posting on social media to ask about who has a good full body workout, look no further.
Even though the cottage floor project was physically challenging because I got up and down off the floor 5,728 times it turned out even better than I expected.
Cost for this project:
$35.00 for the stencil (I don't remember which one I ordered and the packaging has no name, but there are several online that look like it.)
$38.00 for a quart of Jolie Terra Rosa
$12 dollars for each sample size. I used three different colors.
$12.00 for concrete patch
The total was less than a hundred bucks but I did already have the necessary tools like the mini roller and sandpaper. Compare that cost to the hundreds of dollars a new floor would have cost. It's also ready to be tiled if I ever decide to do that.
After six months it looks even better. Every bad thing that happens to it only enhances the character and it hides dirt like a champ!
Let me know if you try this at home and let me know how it turns out!
Labels:
Home Recycled,
Project Empty Nest,
Simply Home
 Michelle is a beekeeper and master gardener. She writes and speaks about beekeeping, DIY projects, and how to live your best creative life.
Tuesday, September 10, 2019
Why Now is the Time to Think About Your Spring Garden
Usually, in September I'm over the garden. I'm looking forward to building the first fire and digging out my favorite sweater. Meanwhile, the AC is still on full blast and I'm cursing every ninety-degree day.
But as a gardener, I'm not just focusing on fall cleanup and putting the garden to bed because right now is the best time to think about next March.
Is there anything better than that first daffodil or a bed of tulips?
Is there anything better than that first daffodil or a bed of tulips?
Late summer is prime time to be ordering your bulbs for your spring planting. Bulb companies start to ship in September and often sell out of their most popular stock if you wait too late. For many years by the time I was ready to think about a spring garden the things I wanted most were already sold out.
Planting is less restrictive. I have planted bulbs as late as the week of Christmas when it was spitting snow, but now make a reminder for myself in my calendar to get it done much earlier. I like to get it done in October but If we have a warm fall I push it back a bit because you want the soil temperature to have cooled down by the time you plant your bulbs.
You have a lot of leeway about when you can plant but order your bulbs sooner rather than later so you don't miss out on the best selection.
Don't know what to buy? Read The 5 Decisions You Need to Make Before You Buy Your First Plant.
Bees need those first spring blossoms when they are gearing up baby bee and honey production in the spring. Here are some good choices for bees:
Don't know what to buy? Read The 5 Decisions You Need to Make Before You Buy Your First Plant.
Bees need those first spring blossoms when they are gearing up baby bee and honey production in the spring. Here are some good choices for bees:
- crocus.
- daffodils.
- grape hyacinths (Muscari)
- hyacinths.
- iris.
- Siberian squill (Scilla siberica)
The Takeaway:
Plan next year's spring garden.
Order bulbs in September, companies ship at the correct time for planting in your area.
Plant when the soil temperature starts to cool, anytime in the fall.
Labels:
backyard artisan,
garden,
products and companies
 Michelle is a beekeeper and master gardener. She writes and speaks about beekeeping, DIY projects, and how to live your best creative life.
Monday, September 2, 2019
5 Ways to Rethink the Space in Your Home
Do you have one of those rooms that can't decide what it wants to be? Or maybe life just keeps changing and you need to use the space differently.
One day while I was standing in front of my crowded closet that I've shared with my husband for our whole married life, I wished for my own closet. Then it dawned on me. I had one! It only needed cleaning out and my clothes moved into it. I also hung up a couple of hook racks so I could enjoy putting outfits together and enjoying the clothes I already had.
My studio has been through several iterations since the kids left home. You can read about the first makeover here. Warning. The before pics are a little frightening. Just kidding, they are terrifying, so gird your loins.
More recently I did a little refresh. Check that one out here. Still so cluttered. I was trying to use the space like I'm an artist when what I really needed was some decent closet space, a calmer place to write, and a place to stretch and do some yoga.
Where to start
If you have a closet or room or even a corner of a room that you need to rethink, here are some tips to get started.
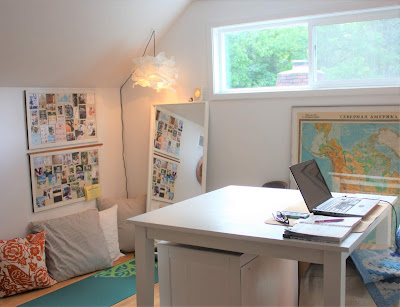
1. Clear the walls. This will help calm your mind and see the room in a new way. For me, this meant removing the maps covering the outside wall. There was an immediate transformation as the visual chaos decreased.
2. Reduce the amount of furniture. What is in your house that you don't really need? In my case, the chest of drawers went to my daughter's new house 3 years ago, I sold the easel this spring (it's in the far corner being used as a desk), and I painted the table to lighten up the space. I also got rid of FOUR chairs that were in this room. I agonized over getting rid of them, but don't miss them at all.
The only remaining map is the giant Russian one of America's natural resources. Nothing cheers up a space like some good old Cold War memorabilia.
3. Rethink how space is being used. If you are an empty nester you know that when the kids move out they take only what they need or want and the rest of it languishes around in unseen areas of your home like their old closets and the attic. In the studio, I had a large perfectly good closet filled with my son's clothes he didn't want, trophies, and guitars. I was too depressed about how bad it looked to take a before picture.
It only took me an afternoon to move some stuff into another closet, shoot him photos of things I thought me might need, and make the trip to Goodwill. Then I moved my clothes into their new home where they can breathe!
A couple of hook racks in the corner next to the closet make it fun to put outfits together and my husband isn't hanging around waiting for me to decide what I'm going to wear so he can get in his side of the closet. 36 year problem SOLVED. I'm a slow learner, okay?
4. Create the space you actually need. Consider how you actually need to use a particular room or corner of a room. I used to do yoga and exercises that needed to be done on the floor in the guest cottage. When I removed the carpet, however, it became uncomfortable to do those things on a concrete floor. I needed a little corner for yoga.
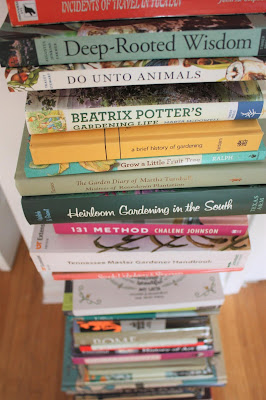
5. Solve nagging problems. Around the house, I love to use my favorite hardbound books for decorating and filling bookshelves. But what to do with all the practical trade style paperbacks that I use constantly?
I spent a hundred bucks on Amazon and solved the problem in a way that makes those books look like a work of modern art.
Maybe you need a cozy reading nook or place to write your own book. If you are wishing you had an extra closet, craft area, or prayer closet, look around your house and see if there is some space that you thought had to be used in a certain way that you can rethink.
And if you are the proud owner of a brand new empty nest, pop the champagne and tell me what you are looking forward to most in the comments. Cheers!
XOXO Y'all!
 Michelle is a beekeeper and master gardener. She writes and speaks about beekeeping, DIY projects, and how to live your best creative life.
Subscribe to:
Posts (Atom)


