Tuesday, June 18, 2019
Deconstructing a Loveseat
It's a fact of life and DIY that things get worse before they get better. If this project had a quote it would be by Churchill, "When you're going through hell keep going."
Because really, who wants to stop and rest in hell?
It took me several years to know what to do with a free loveseat some friends gave us a few years back but then it came to me like a flash. Here's what I started with. A well made functional loveseat with some fairly dated fabric.
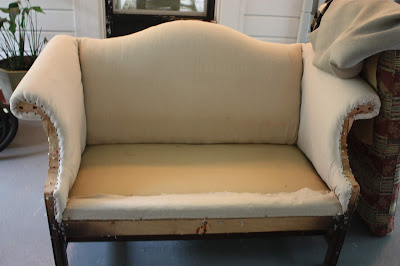
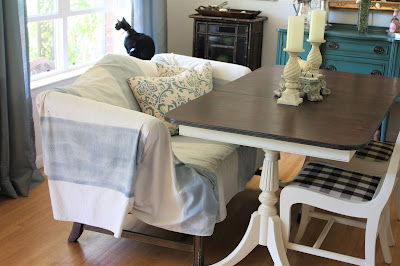
You might not recognize it because for the past couple of years it has looked like this.
How did I miss the micro-trend of deconstructed furniture? Why didn't y'all tell me? Check it out on Pinterest if you have no idea what I'm talking about.
It basically involves ripping all the fabric off a piece of furniture. Then adding back however much you want. I wish I could tell you how to do this. It is what it sounds like. I had to stop two hours in to run to Walgreens for Acetaminophen and Ibuprofen. Here are the other tools I used.
I found that the handiest tool was a really long skinny flathead screwdriver for prying fabric loose and then needle nose pliers for gripping staples and pulling them out. I now officially hate staples.
I should also say this: Actually reupholstering it would have been easier, so if you think this was the easy way out, keep reading.
Let me give you some advice if you are going to attempt this form of abuse. 1. Don't do it in your house if you can help it. It's nasty every step of the way and this piece wasn't even that old. 2. Wear gloves. So many staples. 3. Take a lot of breaks. It's like an all-day wrestling match. But eventually you get down to the bare bones of the thing and in the picture below you can see that I started reupholstering parts of it with drop cloths.
Again the how-to of this thing is really however you can, but taking off the back reveals how a lot of it is put together. I used a paint stirrer to shove the new fabric under the back and then tacked it to the frame. The sides worked the same way. Turning the piece over makes it much easier to do some of the work.
I was so happy when I uncovered the frame of this arm. I knew I'd be leaving this exposed.
I used drop cloths for the inside areas where you sit. On the outside areas, I used burlap. That is what was under the fabric on the back but it was old and dirty. I removed so much batting which immediately made this piece seem daintier and more streamlined.
In the photo above you can see some kind of indestructible fabric which was obviously created by Satan. I pried. I pulled. I cut. I cried. WHAT IS IT? It had threads of plastic running through it that reminded me of some old school tape from the 70s my dad used to use when he didn't have duct tape. I ended up cutting most of it out then just tucking the rest of it inside as I tacked on the new fabric.
You could speed the process up by using some kind of adhesive or a staple gun, I, however, chose to just use upholstery tacks for the entire project. My favorite part was putting the fabric on these curved arms. You could use the material you remove as a pattern for the new fabric but I just tacked and cut as I went. Carefully.
I knew on the back I wanted to add a detail, so I stamped No. 72 using Iron Orchid Decor Stamps. To me that makes it feel so legit. I stamped the burlap before attaching it.
I'm all finished except for covering the cushion which will be sewn.
I love the little pom poms of batting that are stuck in the wood. I still have lots of staples to remove but I'll probably leave these.
Why 72? I have no idea except when I saw the finished piece in my mind that's the number I saw there.
I loved this project. But if you are tempted to try this at home, let me warn you, it's a bloodbath. Well, there wasn't any actual blood but it was a battle. It's not for the faint of heart (faint of anything for that matter) Again...staples. but I cannot get over how it turned out. For the sake of these photos, I covered the cushion with some grey burlap.
I am in love with this project and if there is an actual bloodbath it will be if the cat tries to continue to use it as a scratching post.
 Michelle is a beekeeper and master gardener. She writes and speaks about beekeeping, DIY projects, and how to live your best creative life.
Sunday, June 16, 2019
The Evening My Dad Became a Time Traveler
The best gift my dad ever gave me was teaching me to tie a half Windsor, but I couldn't have known it at the time.
"Mom, do you know how to tie a tie?"
I stopped in the doorway and time stood still.
I heard my dad's voice. "Let me teach you how to tie a tie."
I stepped into the room where my son stood and said: "Let me tell you the story of how I know how to do this."
I adjusted the tie around his collar. "This is the half Windsor knot. " Start with the wide end of the tie on your right and extending a foot before the narrow end.
"I was just your age and I was getting ready for church on a Sunday morning. As I passed my parents' bedroom my dad said 'Hey come here a minute."
"I'm trying to get ready!"
"I know but I want to show you how to tie a tie."
Cross the wide end over narrow and turn back underneath.
I said "I'm a girl. Why do I need to know how to tie a tie?"
Bring it up and turn it down through the loop, Pass the wide in from the front, from the left and to the right.
"Because someday you are going to have a son and you will need to teach him how."
"Won't my husband do that?"
"What if he isn't around for some reason?"
Then, end up through the loop, and put it down through the knot in the front, tighten the knot carefully and draw it up to the collar.
"And here we are. I know how to help you because my dad imagined a moment just like this."
"Wow. You never told me that."
I realized I had forgotten it completely until this evening. How like my father to teach me something I'd need long after he was gone. Teaching someone something is a way of reaching into the future.
I straightened my son's tie and stood back to notice how tall he had gotten the year before. How much like his grandfather he looked. I tamped down emotion and smoothed over freshly unearthed pain.
"Thanks, Mom."
I smiled at the son I'm so proud of and wished my dad was here to see this moment. My son is so like him in looks and personality. They would have loved each other so. I hate that they missed each other in time.
"Thanks, Dad," I whispered to myself as I left the room. I silently marveled at what had just happened. Through whatever means; premonition, fatherly foresight, dumb luck...my father had managed to show up just at the moment I needed him and be part of a special event for his grandson.
Thanks again, Dad.
Labels:
Inspiration,
Life,
lifeprint,
memoirs,
Observations,
Relationships,
Writing for real
 Michelle is a beekeeper and master gardener. She writes and speaks about beekeeping, DIY projects, and how to live your best creative life.
Wednesday, June 12, 2019
Frame Makeover Part 2: From Somber and Serious to Fancy and Elegant.
In the end, this frame did not want to be dark and serious. It wanted to be fancy and light. You can see that the dark frame just didn't suit the room. Thank goodness I propped it up to see what it would look like before reframing the painting. Read about how to recreate this look.
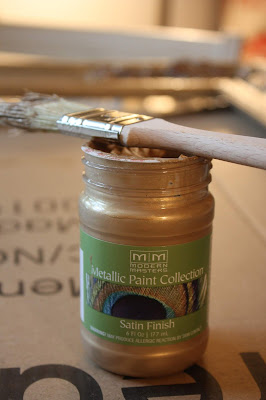
It wouldn't have been terrible, but the gold is so much better in the space. The solution to the final finish was Modern Masters Metallic Paint in Pale Gold.
I just brushed it on around the gold-leafed details and then went back and hit the high spots of the embellishments to give it extra shine. I had darkened the gold leaf significantly by going over it with the stain previously. It needed a little pick me up around the edges to tie in with the new finish.
Any trepidation about going over the stain was dismissed as soon as I saw how fantastic the gold looked! This was definitely the right look for this frame.
I mean, yall. I seriously almost couldn't stand how beautiful it was and it only took me about 20 minutes! Although I do think the look benefitted from the layered process I did. The depth and dimension are from all those under layers that show through here and there.
Oh my gosh. Oak leaves and acorns are my favorite motif!
It was all I could do to let the paint dry before putting the frame back in and hanging it up! This painting is so cool. I wish I knew the history of it. I don't see a signature anywhere.
I doubt it's worth a million bucks but it sure looks like it is hanging up in the dining room. I looked for a blog post about how I switched the dining room and living room and couldn't find it. But if the rooms in your house aren't working for you, then switch 'em up! Do we need a post about that?
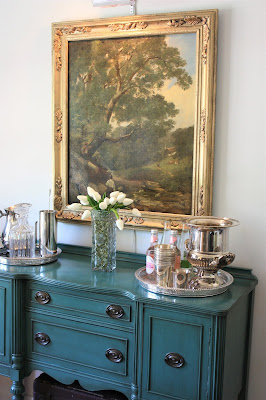
Meanwhile here are some photos of the current state of the dining room with the painting. You'll notice I didn't say completed or finished dining room. I have a couple more projects up my sleeve for this room.
I love a sideboard or bar that looks like it's set up and ready for an impromptu party!
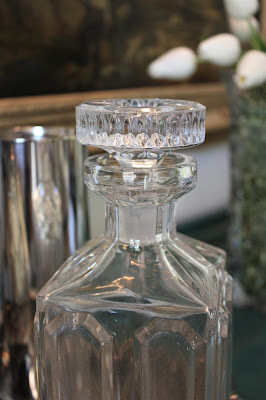
This beautiful lead crystal decanter was a recent estate sale purchase for ten bucks! I'm afraid to use it but it's stunning!
Second-hand silver is a real weakness of mine.
Now let's step back and see how it all works together.
Read about my free dining room makeover from last summer.
Also, one last thing. Who thinks this loveseat wants to be deconstructed?
You don't have to have all the answers when you start a project. Just know the direction you want to go and get started.
XOXO Y'all!
 Michelle is a beekeeper and master gardener. She writes and speaks about beekeeping, DIY projects, and how to live your best creative life.
Friday, June 7, 2019
Frame Makeover How-To: The Somber and Dramatic Version
This is a two-part post showing the same frame done in two different styles.
This oil painting is one of the nicest things in our house. My husband found it on the side of the interstate 40 years ago. Those two pieces of information kind of sum up my decorating style. It was the ultimate roadside pickup! Since part of the detail was chipped off, my mother in law chipped off the rest of it and finished it with one of those antiquing kits that were popular in the seventies.
We've come a long way, baby.
It's bothered me for the 27 years we've been in this house. I love the painting and always wanted it to have a frame worthy of it, but wasn't quite sure how to make that happen. Can I just say this is a great time to be a person who loves projects? If you can envision it something exists to make it happen. So many great products. I feel like I used them all on this piece. You'll see.
Let's start with a before.
The first step was to try and decide what the frame originally looked like. My husband said it was dark wood and I could see that the details had been on each corner, top, bottom, and sides. So there was the precedent. I knew where details should go but what should they be? Flowers? Swags? Rope?
I focused on the tree that is prominent in the painting and decided on acorns and oak leaves.
Okay, y'all. If you don't know about Iron Orchid Designs products you are in for such a treat! They make these fantastic molds and paper clay that air dries. I created all the oak leaves and acorns plus glued them on using Tacky Glue in about an hour! It took no time at all and was super fun.
Watch a how-to video from IOD here.
None of the products I used has any odor. I was working outside because It was too beautiful to be indoors.
As the clay continued to dry it shrank so there were areas that pulled away from the paint.
This is just the way the clay works and this is supposed to happen. It won't matter as you'll see. Next up was applying the General Finishes Gel Stain in Java. I used a medium chip brush for the frame and an artist brush to squish it in around the details. I wiped back the excess stain as I went.
A word about the stain: I did this during a rainy few days and it took a long time to dry. Be patient. Remember when doing all kinds of projects the temperature and humidity may be a factor.
See? The shrinking didn't matter at all! As soon as I got the stain on this piece started to look like carved wood. I was super excited!
As soon as the stain was dry (24 hours later it was still tacky but the details seemed drier probably due to being porous) I started adding the gold leaf.
It looked pretty rough but so many layers were going to go on top that I didn't panic. My gold leafing skills are pretty sketchy, As you'll see though, it makes absolutely no difference.
Let's take a moment to talk about your project attitude. Y'all. You can play. It's okay. I hear so many people talk about making mistakes or messing something up. Yes! That's what happens sometimes! Where did this fear and need for perfection come from? Some of my best work comes from something that didn't go the way I meant for it to. Relax. It's all supposed to be fun. PLAY!
When I got all my gold leafing done it felt too stark. Too much shiny goodness against the stain. I started to rub it with dark wax but decided to go with the stain over the gold leaf for even more drama. I wiped it back hard as I went. Then I mixed up some Miss Mustard Seed Milk Paint in Grain Sack to make a wash to simulate aged dried out wood.
I just swished it on with a brush in sections, wiping it back immediately as I went. I especially wanted it to gunk up in the corners and around details to look a million years old. I just kept wiping it back as I went.
Now we're getting somewhere! This layered crusty goodness is what I'm after!
Just look at how gorgeous it looks next to the painting!
I have to say I was a little impressed with myself. But it wasn't my skills it was the incredible products that are available to create whatever your little decorating heart desires. There is literally zero skill required and even a beginner can create this look as long as you are willing to dabble, experiment, and play.
I could have stopped here if the setting for the painting had been different. We'll cover how it all turned out in the next post.
HOW-TO WITHOUT ALL THE CHIT-CHAT:
NOTE: In the Memphis area all these products are available at Me & Mrs. Jones.
- Remove painting
- Clean frame.
- Mold and glue on clay details.
- Paint with base color - Jolie Terra Rosa
- Apply General Finishes Gel Stain in Java wiping back excess as you go.
- Let dry 24 hours.
- Apply sizing and gold leaf to details
- Brush on Miss Mustard Seed Grain Sack watered down and wipe back.
- Brush stain over gold leafed areas and wipe back.
- Let dry
- Either leave as is or seal with Jolie clear and dark wax.
 Michelle is a beekeeper and master gardener. She writes and speaks about beekeeping, DIY projects, and how to live your best creative life.
Subscribe to:
Posts (Atom)


