How to Plan 2018 Using Direction and Intention Instead of Goals


How can we use intention and direction instead of goals in the upcoming year? Goal setting when you don't know what you want can seem impossible. In fact, it can be paralyzing and prevent progress if you think it's the only way to be highly productive. How can you plan if you don't know exactly what the goal is?

To do lists are boring and goals can be intimidating! 

There is another way. There is always another way. I've spent my life finding a system that works for me and while I look like a slacker on paper (compared to my super organized over achieving daughter, OMG if goals are your thing don't miss her blog, Organized Charm) people often ask me how I get so much done.

 Also, there's nothing wrong with not knowing precisely what you want to accomplish. How am I supposed to know in January what I'll want to accomplish in August? I'm talking to you, planner industry. And it's not just a problem for twenty-somethings. Throughout life you will experience changes that make you say "What now?" Life is full of cross winds and storms. It's useful to know how to adjust your sails.

Enough rambling already, you say? Fine let's get down to it. 

I recently got out my planner and looked back over my goals for 2017. I had written down 5 things I wanted to accomplish by the end of the year. Want to guess how many I achieved?

Zero.

I didn't write that e-book. 
I didn't create that product I had in mind.
I didn't make that Youtube series of videos.
I didn't get the Airbnb going in the guest cottage. 
I didn't get a piece of writing published in a magazine. 

Yep. That's right. Zero. Hooray for failure! If you think that's crazy talk check out this book by Scott Adams.  I had a lot of  positive things happen this year. Just not THOSE things.


1. Focus on intention or direction, not goals. 

When the year kicked off my intention was to move in the direction I wanted to go.

On January 1st I woke up and resigned from a volunteer position on an advisory board for a local retreat center. I knew I was supposed to resign from being a docent at the local art museum as well but it took me until the end of summer to get around to doing that. I wanted to eliminate everything I was spending time on that wasn't going in the same direction. I didn't want to talk about what other people had created. I wanted to create. 

The direction was: creativity, beekeeping, gardening. All of which really fall under creativity for me. If it didn't relate to these three I wasn't going to keep doing it. Being serious about intention can be more important than setting specific goals. I suspect this is especially true if you aren't a goal driven Type A personality. If you are a Type B and goals make you uncomfortable or feel like they don't give you enough space for creativity and spontaneity you are my people! .

2. Release excess activities and things to make space to create the life you want. 

The most important lesson of the year was that I can create an environment for things to come my way. I know that sounds all woo woo, but creating space in your life for the things you want by eliminating excess actually works.


I spent January cleaning out. Everything. Every drawer. Every closet. Every cabinet. It was strange, but as I cleared the space and the air I felt like I was creating room for something good to happen. Read more about that here. 

In February I fixed and repaired a number of broken things around the house I hadn't gotten to for some reason or another. The air pulsed with possibilities. Check out Fix-It February. 

In March I wrapped up loose ends including scattering my mother's ashes. 

As I accomplished each thing it seemed like there was space for new things to happen. And they did. Immediately after the clean out my daughter announced she was expecting. I received an invitation to speak at a luncheon. I started to meet new people and reconnect with old friends. I got offered a chance to do a pop up at my favorite shop and a job offer. Recently I got an offer for a photography gig.

Remember, none of these things were on my goal list for 2017.


3. Let the opportunity reveal the path.

Yet things I wasn't looking for but secretly wanted found me. New creative doors opened. Opportunities landed in my path. Questions I had were answered.

Now I'm not saying you shouldn't have goals. You should. And you should write them down or post them on a vision board, or whatever works for you. It's great to be deliberate. But don't think you have failed if they aren't achieved exactly as you imagine them. If you aren't goal oriented, then a better plan for you may be an intention and direction. Pruning your obligations. Creating space.

And let's be honest sometimes we don't really know what we want. We have a general idea but lack direction. In that case just do the next right thing. You don't have to see every step or even your destination if you don't have clarity. But move. Forward. I'll bet you have a general direction in mind of where you want to go. Move toward it.

Keep learning and growing and becoming your best self. When you don't know what to work on--work on yourself. For years this was my only real strategy. I didn't know what I wanted to do after the kids left home, so I constantly read and taught myself new things. Years later when things began to happen I was ready.

Chance favors the prepared mind. ~ Louis Pasteur

As the year winds down and we start shopping for planners to lay out strategies for 2018 keep the long game in mind. Ask yourself--what is your ultimate goal? What needs to be eliminated? What does your ideal life look like? Create a vision board that looks like your dream life.

Start taking steps, no matter how small, toward the life you want. You'll be closer than you were before and if you have been around here long you know the drill:

The universe responds to action. 


Modern Masters Metal Effects: Creating The Ultimate Patina Finish


Modern Masters Metal Effects solved this severe personality conflict of mine. I love things for my house that look like they've been around forever. I'm also super impatient as my husband can attest to. But realistically I don't have a hundred years to wait for something to develop a beautiful patina. And I also don't want to drop a small fortune for the real thing.

Dang. What's a girl to do?

Luckily you and I can now achieve this gorgeous oxidized metal finish in an afternoon thanks to Modern Masters Metal Effects. I first discovered this miracle working paint at a workshop on how to use these products at , Me & Mrs. Jones.

Now that I work there I get to push my patina addiction on others. 

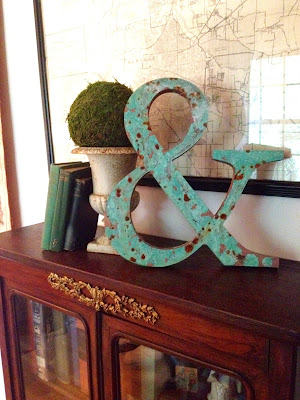
Let me start by showing you the finished product we created in the class. I was thrilled it was an ampersand since it's in the name of my blog and honey.

modern masters paint finish

While I was sitting in the workshop I was picturing these two hammered metal lanterns on my back porch from Pottery Barn.

modern masters paint finish

 They must have been made for indoor use because they were getting really pitted with rust. In some instances I adore the look of rust but on these pieces it wasn't a good look. I snapped up the products I needed after the workshop and couldn't wait to get on these the next day.

metal effects copper

Here's the overview but of course you'll want to read the directions and follow them. You start with a primer coat if you need that and then the base coat of the metal paint. I loved the copper and am going to have to show some restraint so my house doesn't end up looking like I inherited a copper mine. See how the rust wasn't the cool kind? I think it's because the original finish was super shiny and the contrast isn't a good one.

rusty lantern makeover

This basic technique is to apply the paint. which has actual metal in it, so the oxidation process is real and not just a faux finish, then apply the oxidizing solution. In the workshop we learned a few other tricks like dribbling peroxide and adding a powder like Gold Bond. I just used a generic baby powder for this and it worked fine. This process was very forgiving for someone like me who likes to experiment.

copper patina

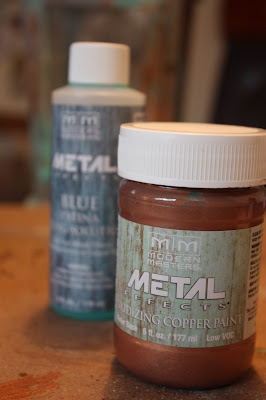
 Here are the paints you need to work this magic. Scroll to the bottom to see how I used the bronze paint for a garden detail. Need some drool worthy inspiration of how you could use these amazing products? Check out their site here.

metal effects and oxidizing solution

But I wasn't done. The glass on these beauties was clear and I didn't like being able to see the inside of the lantern was still the original finish. I wanted my illusion to be complete! Luckily I had some  Krylon Frosted Glass spray paint on hand from some my Christmas windows.


It only took a minute to spray the glass and finish this project. I am in love with how they turned out!


In the tablescape above I also used Modern Masters Metallic Pain in Warm Silver to highlight the pumpkin details. It gives a soft sheen and a little glow to anything you use it on.

frosted glass spray paint

So of course you know what happened. I kept looking around for things that would benefit from this little upgrade. Here are a couple of those for bonus points. DING! DING!

The mail box...

metal effects copper patina

A table top turned into a faux sundial...


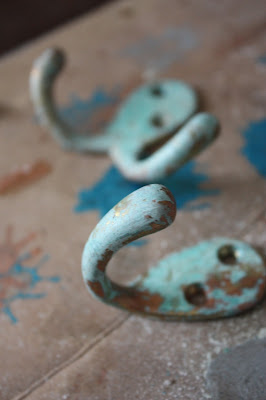
A couple of ugly brass coat hooks...

metal effects

Okay, y'all! There you have it. Now go forth and oxidize!

Reclaiming My Husband's Childhood Rocker for our Grandson


You know how you have stuff that's "around" your house? You do, right? You have yucky furniture or an old lamp that needs to be rewired but it got tucked away years ago and fell out of your brain. Are you with me? Then something happens or you see a Pinterest photo and you remember.

Good. I knew you were my people. 

When our grandson was born my husband dug his childhood rocker out of the attic and sat it in the studio. It had some fabric his mom had safety pinned on to cover the original rush seat which had rotted through. And it was really dirty from being in the attic for 50+ years.

FIFTY PLUS YEARS, Y'ALL!


Oh, and I'm  pretty sure it was painted with lead paint. 

It needed some love. I wondered if red was the original color or if it had been painted.


Then my husband found a box of old 8 mm film from the early 60s and he spent a couple of weeks going through them. Guess what he found on one of them.


Yep. Film of him wearing a cowboy hat and sitting in the red rocker! Confirmation on the original color!


Also in the box were films of another family and through the magic of the internet he tracked down those sisters who were little girls in the film and shipped the film of their parents' vacations, visits to Graceland, and Easter dresses to them. I don't care what else is happening you can't tell me this is not a great time to be alive. 

Okay, back to the rocker. I chose Miss Mustard Seed Tricycle for the color and decided to wet sand it with hemp oil for a smooth finish and a safe product to come in contact with my grandson's skin.


This is where my kids like to point out that I did things when they were little like put them to sleep face down in our waterbed. Blah. Blah. Blah. You're alive aren't you? 

If you are concerned about the toxins in paints you are using Miss Mustard Seed's Milk Paint is a great choice for you. Milk paint has been used for thousands of years and only has 5 ingredients.


You can use Miss Mustard Seed's Beeswax for a finish but I chose hemp oil because I wanted to try wet sanding for a smooth finish.


I was looking for someone to recane the seat when my boss and friend Me & Mrs. Jones suggested strips of fabric.


Ack! Why didn't I think of that? I even had THE PERFECT fabric leftover from the Scandinavian inspired elf dolls I made last year for Christmas.


I love all things Scandinavian, read about my obsession here.


This just involved cutting strips of fabric and tying them on the rails across then doing the same thing the opposite direction weaving the strips like you did when you made that potholder in elementary school.


Easy peasy.


Here's what it looks like all finished!


How to Create a Sign With Faux Hand Chalk Lettering


 A few weeks ago I lucked upon a piece of wood that looked to have been cut out for a sign but was never used. I picked it up for a dollar at a yard sale. It's been sitting around in my studio waiting for the right project.


Recently I ran across some pictures I had pinned months ago. They were farm scenes/signs that looked like they were done in chalk. BAM! There was my inspiration for my next project.

But first--what kind of finish for the sign?  In a recent workshop on Annie Sloan Chalk Paint we'd used two colors of paint to create an effect that looked very much like zinc. I had been dying to use it on something. This sign would be perfect!


I used two layers of Annie Sloan's Graphite. And let me clear something up, chalk paint is NOT the same thing as chalkboard paint. Though this particular project is creating no end of confusion, I'm sure. You're welcome. 


After that was dry I washed on Louis Blue thinned with water and wiped it back off.


It was a simple process and the next step would be to wax it but I couldn't apply wax until after the lettering was finished. Printing out the words allows you to experiment with how to lay out your sign.


First I added some chalk marks where I knew I wanted the center and edges to be, then played around with spacing.  For the free hand parts I used a white chalk pencil like you use for sewing. For some of the lettering I printed out the text in the size I wanted and then used carbon paper, tracing around each letter with a pencil.


Want to have fun with Millenials? Go into an office supply store and ask for carbon paper. It's like describing pistachio ice cream to The Thing From Outer Space. 

I kept referring to the original pictures for some of the details but had to find a vintage bee skep image to free hand for the main part. Once it was all laid out I was ready to paint.


You could use chalk for this project or a chalk pen but I wanted something permanent and I thought Miss Mustard Seed's Milk Paint would be ideal for this project. Grain Sack seemed like the best choice. It looks, well...chalklike. 


If you are doing a project like this then it's all fun and games until now. Now it's time to add the paint. Chalk is one swipe away from correction (or ruin) but once the paint is applied there's really no going back.

Breathe.

Because I've had a busy few days this project took me about a week. It was a lot of detail. Working from top to bottom to avoid smearing the work below I painted on MMSGS with the two smallest brushes I had. I loved this process!


This is where you put on some series you run across but maybe aren't all that committed to. I ended up watching One Mississippi on Amazon Prime. Darkly funny. Lots of dialogue. Not a lot of action. Perfect for a project. You can't watch anything too thrilling or you end up standing around with a dried out paint brush in your hand and an unfinished project.

This project took me about 5 thirty-minute episodes. This is how you calculate time too, right? 

When all your lines are painted over you can stand back and take a look. I added some extra foliage around the skeps.


It was all a little stark and there were some heavy brush strokes in places so I did a little light sanding.


Give it a quick dusting with a damp cloth to remove any chalk or mess from the sanding and it's time to wax. I applied the wax with a brush and wiped it back. If you want more of a shine wait a while and buff it to the amount of gloss you want to see.


This looks like a coat of White Wax will perk it up a bit, so I'll do that and let you know how that last step turns out over on my Facebook page later in the week.


Want to give a similar project a try? Here's a materials list: 

piece of wood or a board
Annie Sloan Graphite
Annie Sloan Louis Blue
Chalk, chalk pencil
Carbon paper
text to be traced
Miss Mustard Seed Grain Sack, mixed
Brushes 
Clear wax
rags or paper towels

UPDATE: I tried the white wax but it detracted from the contrast of the white on dark. So here's a tip: If you aren't fully committed to your finish on anything from art to a piece of furniture, test it on a corner or other inconspicuous area first!


Updating an Antique High Chair with an Old Fashioned Finish


Now that the bees are taken care of for the next few months, and I've put the garden to bed, I can turn my attention to the inside of my house just in time for the holidays.

Project 1: Antique High Chair

Once again in my zeal to start a project I neglected the "before" photo. 


I have had this high chair for about 30 years. When my mother gave it to me she said my grandfather used it as a baby and it was old even before that. It's put together with pegs. Over the years it had been spray painted numerous times and then about 20 years ago my father-in-law helped me strip it.

Something about it being natural wood made it invisible in my house.

Last week I decided Miss Mustard Seed's Milk Paint would be an appropriate finish for the time period as well as add a bit of cheeriness to it. Chances are if this chair had been painted when it was made, milk paint would have been used. It was looking pretty somber for a high chair.


Because yellow can be a difficult color to get good coverage in any type of paint, I started with a coat of Miss Mustard Seed's Grain Sack to help the yellow pop.


I have another project with this color coming up soon that you are going to love!

Milk Paint comes as a powder and you mix it with water to create your paint. There is something unbelievably fun about that. Stir it up really well. For larger amounts you can use a whisk.

This paint dries super quick so it is wonderful for a project that you want to knock out without hours of drying time between coats. It's perfect for pieces that you want to look authentically aged.

After Grain Sack was dry I was ready to mix and brush on my layer of MMS Yellow.


I added a second coat for more complete coverage.


The last step was to take a dish sponge with a scrubby side and while the paint was still damp, distress the chair in areas where it would have received wear and tear over the years, the edge of the seat, arm rails, and the front of the legs.


 Last I distressed the seat a bit to complete the time worn look. You can also wait until the paint is dry and use fine grit sandpaper.


Seriously, who wants new and shiny when you can have old and beat up?

To finish this off I added a light coat of wax and rubbed it off, then did a bit of buffing the next day. Those pictures in the background are my grandmother's class photos for a couple of years.


If you have a family heirloom that doesn't fit with your decor or your personality it's okay to update it unless the finish is one you love.  But for most of us, the ugly table and chairs or hideous dark dresser can be given a fresh start with a new finish.

That way you can technically tell Grandma that you are using it and it looks fabulous in your house. 

I don't see the painted furniture trend ending any time soon. Who wants to go back to houses full of dull brown furniture?