Wednesday, May 24, 2017
How to Make Home Made Makeup Remover, Cleanser, and Moisturizer All in One
Here's the easiest natural makeup remover and moisturizer in one. Okay, not the easiest because that would just be the oils and no beeswax which works perfectly fine. But you know me I can't leave things alone and adding the beeswax gave it a gel like texture that reminded me of royal jelly.
In this photo you can see the bees building out the honeycomb to store both honey and brood. By the way that big clunky bee in the middle is a drone. This beeswax or comb is what I'm using in my skin care products. Besides adding a thickness and stabilizing qualities it is considered to be antibacterial giving things a longer shelf life and slightly anti-inflammatory which is a nifty quality in anything we are going to put on our skin.
Here's a picture of pure rendered beeswax from my backyard apiary. Read about how I do that in the post, Rendering Beeswax.
The wax is grated and melted then blended with oils to create countless lotions and creams. These are all quite simple to make in your own kitchen. If you don't have your own bee hives it's really easy to find some beeswax online or at your local craft store.
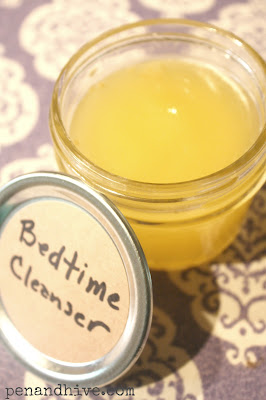
The Bedtime Cleanser is a combination of castor oil, jojoba oil, and beeswax.
Use equal amounts of castor and jojoba oil and melt together with beeswax.
I used: 1/3 C each of the oils to a TBS of melted wax.
It's convenient to melt it all in a glass jar you are going to keep it in. It keeps you from making a mess in cookware and prevents wasting any of the mixture. If you used glass you can melt it right in the microwave or in a waterbath on the stove.
The oils make a lovely cleanser on their own if you want to mix them up in the palm of your hand in the evening but the addition of beeswax makes it thicker and easier to use. Since it's for use at bedtime I added lavender essential oil which makes it perfect as part of an evening ritual. Massage it into skin to remove make up then rest a warm washcloth on your face for a couple of minutes. Pat off excess oil.
What remains on your skin provides enough moisturizer for the night, at least by my standards, and doesn't feel greasy or heavy.
It's all perfectly simple.
If you are interested in trying out some recipes of your own check Pinterest. If you don't feel comfortable playing without rules there are tons of sites for weights and measures as well as a feast of recipes for your skin.
Let me know what you try and how you like it!
Labels:
Beekeeping,
hand crafted skin care
 Michelle is a beekeeper and master gardener. She writes and speaks about beekeeping, DIY projects, and how to live your best creative life.
Saturday, May 20, 2017
How I Cared For My Sick Chick This Week
We had a scare this week. Our chicken, Kitty, a black austrolorpe was exhibiting sick behavior. For poultry that generally means standing still, not eating or drinking, and being lethargic. The only other chicken I've had that was sick was eggbound, which is just about the worst thing that can happen to a hen. So I wasn't going to waste any time finding out the cause of the problem.
I'm no expert but most vets in the city don't know that much about chickens and you may be left to figure things out on your own. With that in mind, here's what I did after doing a bit of emergency online research combined with what seemed like a common sense approach. Again, I'm not an expert but here is what I did that worked in our case.
Inspect and clean out the nest. We'd put fresh hay a few days before so the fact that the nest was heavily soiled was a clue to what might be making her feel so bad. I added lemon balm and oregano from the herb garden to the nesting material to keep pests away. I mixed up lavender, oregano, tea tree with witch hazel and put it in a small spray bottle. I thoroughly sprayed the inside of the coop and nesting materials and left the doors open to air out the area and allow sunlight in. One thing I learned from this experience in my research is to use litter instead of straw in the coop.
Catch the chicken. If you have a chicken that doesn't want to be picked up this can be quite an endeavor even if the chicken isn't feeling well. It took me about 15 minutes.
Bath the chicken. I did two baths because the first one was just getting off all the actual filth. A clean chicken is easier to look over and you can also see if anything comes off in the water like pests. At this point I could see that her backside was red and raw much like a diaper rash. Since I had checked the nest I knew that she'd been sitting on a soiled nest. Could that be the main problem?
Soak. After I gave her a bath to get her cleaned up I ran another sink full of warm water and added oregano oil, which is thought to have some healing properties, to the bath. Just a couple of drops. I held her in the water for 10-15 minutes. Only the first couple of minutes were a fight. Obviously wear clothes you don't care about for this entire process!
Dry thoroughly. I wrapped her in a towel and took her outdoors to sit in the swing. The sun was strong and it was warming up to be a hot day so when she was relaxed and sleepy I unwrapped her and let the sun shine on her underside. I wanted her to be completely dry but also felt like the sun would act as a good disinfectant.
Spray with essential oils. I used the same spray I made for the nesting area on her red and inflamed underside. As I aired her out in the sun I lightly sprayed her with the oil mixture every 5 minutes or so. I have no idea if this helped but it didn't hurt and I was hoping to keep flies away from her. Anyway, it seemed to make us both feel better.
Provide fresh water with a drop or two of oregano oil. I never did really know the exact cause of Kitty's illness. We had recently purchased a new garden hose and there could have been something coating the inside of it. We had noticed foam in the water as we filled the waterers but didn't think much of it until she started feeling ill. The chicken water is now coming from a different source. In addition to changing the water source I added one or two drops of oregano oil to the water which sites recommended as a natural dewormer and overall immune system booster just in case there were worms or some kind of infection. Again, no idea if this helped but it was a small amount and I thought it was worth a try.
After an hour or so of holding her in the sun and spritzing her with the soothing oil mixture, I let her down to run around the yard. She didn't seem better right away but did eventually drink a lot of water. By evening she was occasionally scratching around the yard though she still didn't eat any feed. She mostly sat in cool shady spots of cool earth which I'm sure felt good against her raw skin.
We only have two chickens right now so I didn't feel the need to isolate this chick. In a more crowded situation isolating her from the flock would be a must.
The next morning, she moved a little slow but drank and ate. I also gave them a bit of watermelon rind to get some extra water in her. By day 3 I had a chicken that was back to her old self and looking radiant again.
Have you ever had a sick chicken? What did you do?
Labels:
chickens,
Observations
 Michelle is a beekeeper and master gardener. She writes and speaks about beekeeping, DIY projects, and how to live your best creative life.
Friday, May 12, 2017
How to Create the Look of 100 Year Old Copper In an Afternoon
I have this severe personality conflict. I love things for my house that look like they've been around forever. I'm also super impatient as my husband can attest to. But realistically I don't have a hundred years to wait for something to develop a beautiful patina. And I also don't want to drop a small fortune for the real thing.
Dang. What's a girl to do?
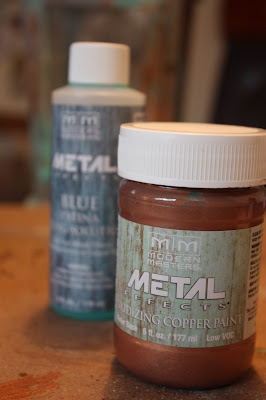
Luckily you and I can now achieve this gorgeous oxidized metal finish in an afternoon thanks to Modern Masters Metal Effects. Last month I took a workshop on how to use these products at one of my favorite local shops, Me & Mrs. Jones.
Cue the song. Y'all have got to check out her adorable--I mean A-D-O-R-A-B-L-E-- shop. I should have thought to take some pics to share.
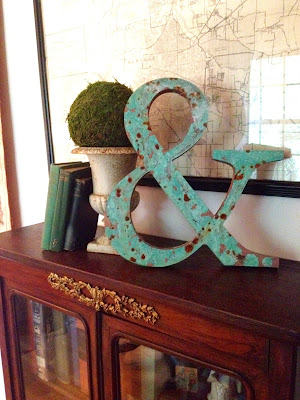
Let me start by showing you the finished product we created in the class. I was thrilled it was an ampersand since it's in the name of my blog and honey.
While I was sitting in the workshop I was picturing these two hammered metal lanterns on my back porch from Pottery Barn.
They must have been made for indoor use because they were getting really pitted with rust. In some instances I adore the look of rust but on these pieces it wasn't a good look. I snapped up the products I needed after the workshop and couldn't wait to get on these the next day.
Here's the overview but of course you'll want to read the directions and follow them. You start with a primer coat if you need that and then the base coat of the metal paint. I loved the copper and am going to have to show some restraint so my house doesn't end up looking like I inherited a copper mine. See how the rust wasn't the cool kind? I think it's because the original finish was super shiny and the contrast isn't a good one.
This basic technique is to apply the paint. which has actual metal in it, so the oxidation process is real and not just a faux finish, then apply the oxidizing solution. In the workshop we learned a few other tricks like dribbling peroxide and adding a powder like Gold Bond. I just used a generic baby powder for this and it worked fine. This process was very forgiving for someone like me who likes to experiment.
But I wasn't done. The glass on these beauties was clear and I didn't like being able to see the inside of the lantern was still the original finish. I wanted my illusion to be complete! Luckily I had some Krylon Frosted Glass spray paint on hand from some my Christmas windows. Remember?
It only took a minute to spray the glass and finish this project. I am in love with how they turned out!
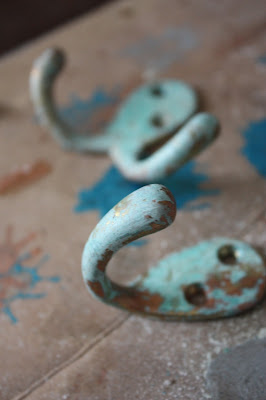
So of course you know what happened. I kept looking around for things that would benefit from this little upgrade. Here are a couple of those for bonus points. DING! DING!
Okay, y'all! There you have it. Now go forth and oxidize!
Labels:
Home Recycled,
products and companies,
Simply Home
 Michelle is a beekeeper and master gardener. She writes and speaks about beekeeping, DIY projects, and how to live your best creative life.
Thursday, May 4, 2017
How To Turn a Chicken Wire Ghost Sculpture into a Garden Dress Form Topiary
One Saturday morning a couple of years ago while browsing Pinterest I ran across this idea of making sculpture out of chicken wire. Luckily I had just enough leftover chicken wire behind the Honey House that I thought I'd give it a whirl. My first version had a bow in the back that I later removed.
I rolled the chicken wire into a tube and twisted the ends together using wire cutters. I didn't stop to get my camera to take pics along the way, but it was a matter of simply scrunching it together with my hands (wear gloves!), twisting some loose ends, and cutting off excess. This is one of the most satisfying crafts I've done in a while. I loved being able to walk all the way around a project.
Start to finish it took about 3 hours and cost nothing since I already had the wire. I love the way she looks in the garden at dusk. It would be fun to make several of these and spray them with glow in the dark paint for the front lawn on Halloween. Right now she's just a fun representation of the very feminine vibe of the bees and hens in the garden.
I loved her just like this but this spring I decided it would be fun to fill her out a bit more. Less ghostlike, more like a topiary in dress form. I had some sheet moss I had purchased on sale and I used floral wire to wrap it onto the form. I planted two pots of ivy, one that sits on the ground and one that sits in a plant stand near where her waist is. I pulled the ivy through the wire and used some bits of moss here and there to help fill in while I'm waiting for the ivy to grow thicker.
I think she looks very elegant and is cheering up a dreary corner of our patio. But I'm already thinking about more ghostly dress sculptures I can make. So stay tuned for those at some point in the future.
Labels:
garden,
Home Recycled,
Simply Home
 Michelle is a beekeeper and master gardener. She writes and speaks about beekeeping, DIY projects, and how to live your best creative life.
Subscribe to:
Posts (Atom)


