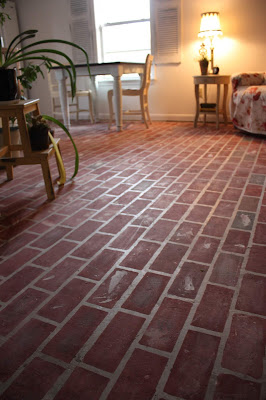
I've always wanted to do a painted floor with a brick stencil. I finally had the opportunity to do that in the Pen & Hive Cottage last spring when we had the carpet and linoleum I had ruined with honey and beeswax ripped out.
Insiders tip: Beekeeping is a super messy hobby.
I needed something indestructible because this is a workspace for me.
I ended up paying someone to rip out the old flooring because I used to think that stuff was fun and I was too cheap to pay anyone to help me. My 34-year-old self was like "Oh, my gosh! you'll charge me how much?" My 54-year-old self says "Do you take Venmo?"
I couldn't really explain my plan for the stenciled floor in a way I could get my husband to understand. Mainly because he kept trying to buy me a new floor and I kept saying no. Let's just say this is not usually how those conversations go.
Pre-Project Info:
If you need to get this done while your husband is out of town read Guerilla Decorating: A 5 Step Guide to Decor-Revolution.
If you missed my post about prepping to paint concrete, you can read it here.
An important part of the prep is definitely going to be creating a sample board to nail the color combo down. Obviously so you can then completely ignore it.
When I imagined doing this project I envisioned a regular size paint roller on the end of a pole where I would knock out this floor painting business before lunch. Oh, wait. I forgot who I was. I should have known I would want to paint each individual brick a different color to achieve the most realistic look possible.
How to Paint a Faux Brick Floor:
Note: If you were painting a floor all over for a smooth finish the prep work would be much more intense. For this project, I used the imperfections to mimic actual brick. Plus I do not like intense but can completely get behind imperfect.
1. Clean and prepare the surface. This includes using premixed concrete to fill holes created when the carpet was removed. Sand the patches smooth after they dry and sweep up any dust and dirt. I swept and then used a shop vac.
2. Lay out the stencil according to your design. For this floor, I wanted an edge of straight brick which I thought looked more authentic than a brick pattern that just disappears under a wall.
3. Choose and mix paint colors. This depends on the color of brick you are trying to recreate. The outside of our house is red brick but I wanted a good bit of pink to tie in with the cabinets and countertops. The base color was Jolie Terra Rosa, with hints of Sage, Legacy, Palace White, and Rose Quartz. Have y'all figured out that I'm just making everything up as I go along?
4. Hold your stencil in place with painter's tape then use a roller to apply the paint. A big one if you are normal. A tiny one if you are trying to recreate each individual vintage brick you have ever seen. Because the bare concrete is so absorbent I was able to skip the normal offloading technique which is stenciling 101 and go straight to the concrete. I painted the center of the bricks first (offloading a lot of paint) then worked toward the edges to keep paint from seeping under the stencil
5. Distress. When the basic painting was done I flicked paint, mixed up a whitewash and spread it out in various spots to mimic extra grout, and sanded to achieve a flat clay like finish.
6. Seal with a concrete sealer if desired. I am so happy with how the faux brick turned out and I don't want to ruin it by adding shine. I'm on the hunt for a completely flat/no shine/matte sealer for concrete. I mean let's just toss aside the idea that the point of redoing the floor at all was to seal it and make it durable. It's been six months and the more worn it gets the better it looks.
7. Enjoy your new floor! Because Jolie paint dries on concrete so quickly you can replace furniture and walk on it the same day. Actually, you can walk on it pretty much immediately. Remember when I painted the porch and it took days to dry? Not this time!
Note: for all of you people I see posting on social media to ask about who has a good full body workout, look no further.
Even though the cottage floor project was physically challenging because I got up and down off the floor 5,728 times it turned out even better than I expected.
Cost for this project:
$35.00 for the stencil (I don't remember which one I ordered and the packaging has no name, but there are several online that look like it.)
$38.00 for a quart of Jolie Terra Rosa
$12 dollars for each sample size. I used three different colors.
$12.00 for concrete patch
The total was less than a hundred bucks but I did already have the necessary tools like the mini roller and sandpaper. Compare that cost to the hundreds of dollars a new floor would have cost. It's also ready to be tiled if I ever decide to do that.
After six months it looks even better. Every bad thing that happens to it only enhances the character and it hides dirt like a champ!
Let me know if you try this at home and let me know how it turns out!


No comments:
Post a Comment
Let's put the social back in social media and continue the conversation on Facebook! Check out the Pen and Hive Page.